Sony DCR PC105 Operating Instructions - Page 189
Copying images to DVD with VAIO
 |
UPC - 027242629172
View all Sony DCR PC105 manuals
Add to My Manuals
Save this manual to your list of manuals |
Page 189 highlights
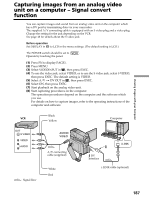
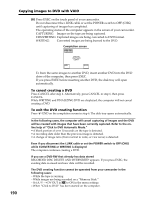
Copying images to DVD with VAIO By connecting your camcorder to a Sony VAIO series personal computer*, it is easy to copy images recorded on a tape onto a DVD. Rewinding of the tape, capturing of images and DVD burning are all done automatically. Use an i.LINK cable (optional) for the connection. Because it takes several hours to create a DVD, powering your camcorder from the AC outlet using the supplied AC Adaptor is recommended. * The computer must be equipped with a DVD-R drive and "Click to DVD" (Sony original software) Ver.1.2 or later must be installed. For details, refer to the on-line help of "Click to DVD Automatic Mode." This function can only be used with Sony VAIO series personal computers. Furthermore, this function cannot be used with some Sony VAIO models, in some countries or regions. For details of compatible models of computer or system requirements, refer to the following websites: - the U.S.A. http://www.vaio.net/ - Canada http://www.sonystyle.ca/ - Latin America http://vaio-online.sony.com/ - Asia http://vaio-online.sony.com/ Viewing Images with your Computer Computer DV Interface i.LINK cable (optional) i.LINK : Signal flow Before operation Turn on the computer and configure it for connection to your camcorder. If any applications using the i.LINK connection are running, close them. The POWER switch should be set to . Operate by touching the panel. (1) Insert a recorded tape into your camcorder. (2) Connect your camcorder to the computer with the i.LINK cable. (3) Press FN and select PAGE2. (4) Press BURN DVD. "Click to DVD" starts automatically on the computer. (5) Insert a DVD into the DVD drive of the computer. 189
-
 1
1 -
2
-
3
-
4
-
5
-
6
-
7
-
8
-
9
-
10
-
11
-
12
-
13
-
14
-
15
-
16
-
17
-
18
-
19
-
20
-
21
-
22
-
23
-
24
-
25
-
26
-
27
-
28
-
29
-
30
-
31
-
32
-
33
-
34
-
35
-
36
-
37
-
38
-
39
-
40
-
41
-
42
-
43
-
44
-
45
-
46
-
47
-
48
-
49
-
50
-
51
-
52
-
53
-
54
-
55
-
56
-
57
-
58
-
59
-
60
-
61
-
62
-
63
-
64
-
65
-
66
-
67
-
68
-
69
-
70
-
71
-
72
-
73
-
74
-
75
-
76
-
77
-
78
-
79
-
80
-
81
-
82
-
83
-
84
-
85
-
86
-
87
-
88
-
89
-
90
-
91
-
92
-
93
-
94
-
95
-
96
-
97
-
98
-
99
-
100
-
101
-
102
-
103
-
104
-
105
-
106
-
107
-
108
-
109
-
110
-
111
-
112
-
113
-
114
-
115
-
116
-
117
-
118
-
119
-
120
-
121
-
122
-
123
-
124
-
125
-
126
-
127
-
128
-
129
-
130
-
131
-
132
-
133
-
134
-
135
-
136
-
137
-
138
-
139
-
140
-
141
-
142
-
143
-
144
-
145
-
146
-
147
-
148
-
149
-
150
-
151
-
152
-
153
-
154
-
155
-
156
-
157
-
158
-
159
-
160
-
161
-
162
-
163
-
164
-
165
-
166
-
167
-
168
-
169
-
170
-
171
-
172
-
173
-
174
-
175
-
176
-
177
-
178
-
179
-
180
-
181
-
182
-
183
-
 184
184 -
 185
185 -
 186
186 -
 187
187 -
 188
188 -
 189
189 -
 190
190 -
 191
191 -
 192
192 -
 193
193 -
 194
194 -
195
-
196
-
197
-
198
-
199
-
200
-
201
-
202
-
203
-
204
-
205
-
206
-
207
-
208
-
209
-
210
-
211
-
212
-
213
-
214
-
215
-
216
-
217
-
218
-
219
-
220
-
221
-
222
-
223
-
224
-
225
-
226
-
227
-
228
-
229
-
230
-
231
-
232
-
233
-
234
-
235
-
236
-
237
-
238
-
239
-
240
 |
 |
