Sony DCR PC105 Operating Instructions - Page 190
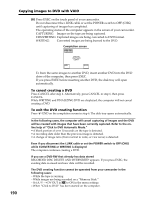
To cancel creating a DVD, To exit the DVD creating function, Click to DVD Automatic Mode.
 |
UPC - 027242629172
View all Sony DCR PC105 manuals
Add to My Manuals
Save this manual to your list of manuals |
Page 190 highlights
Copying images to DVD with VAIO 190 (6) Press EXEC on the touch panel of your camcorder. Do not disconnect the i.LINK cable or set the POWER switch to OFF (CHG) until capturing of images has completed. The operating status of the computer appears in the screen of your camcorder. CAPTURING: Images on the tape are being captured. CONVERTING: Captured images are being converted to DVD format. WRITING: Converted images are being burned to the DVD. Completion screen BURN DVD COMPLETED CREATE ANOTHER COPY? EXEC END To burn the same images to another DVD, insert another DVD into the DVD drive of the computer, then press EXEC. If you press EXEC before inserting another DVD, the disk tray will open automatically. To cancel creating a DVD Press CANCEL after step 4. Alternatively, press CANCEL in step 6, then press CANCEL. While WRITING and FINALIZING DVD are displayed, the computer will not cancel creating a DVD. To exit the DVD creating function Press END on the completion screen in step 6. The disk tray opens automatically. In the following cases, the computer will cancel capturing of images and the DVD will be created with images that have been currently captured. Refer to the online help of "Click to DVD Automatic Mode." •A blank portion of over 10 seconds on the tape is detected. •A recording date older than the previous image is detected. •A change of image ratio (from normal to wide, or vice versa) is detected. Even if you disconnect the i.LINK cable or set the POWER switch to OFF (CHG) while CONVERTING or WRITING is displayed The computer continues creating a DVD. If you use a DVD-RW that already has data stored RECORDED DISC DELETE AND OVERWRITE? appears. If you press EXEC, the existing data is erased and new data will be recorded. The DVD creating function cannot be operated from your camcorder in the following cases: - While the tape is running. - While images are being recorded on a "Memory Stick." - Set A/V t DV OUT in to ON in the menu settings. - When "Click to DVD" has been started on the computer.
-
 1
1 -
2
-
3
-
4
-
5
-
6
-
7
-
8
-
9
-
10
-
11
-
12
-
13
-
14
-
15
-
16
-
17
-
18
-
19
-
20
-
21
-
22
-
23
-
24
-
25
-
26
-
27
-
28
-
29
-
30
-
31
-
32
-
33
-
34
-
35
-
36
-
37
-
38
-
39
-
40
-
41
-
42
-
43
-
44
-
45
-
46
-
47
-
48
-
49
-
50
-
51
-
52
-
53
-
54
-
55
-
56
-
57
-
58
-
59
-
60
-
61
-
62
-
63
-
64
-
65
-
66
-
67
-
68
-
69
-
70
-
71
-
72
-
73
-
74
-
75
-
76
-
77
-
78
-
79
-
80
-
81
-
82
-
83
-
84
-
85
-
86
-
87
-
88
-
89
-
90
-
91
-
92
-
93
-
94
-
95
-
96
-
97
-
98
-
99
-
100
-
101
-
102
-
103
-
104
-
105
-
106
-
107
-
108
-
109
-
110
-
111
-
112
-
113
-
114
-
115
-
116
-
117
-
118
-
119
-
120
-
121
-
122
-
123
-
124
-
125
-
126
-
127
-
128
-
129
-
130
-
131
-
132
-
133
-
134
-
135
-
136
-
137
-
138
-
139
-
140
-
141
-
142
-
143
-
144
-
145
-
146
-
147
-
148
-
149
-
150
-
151
-
152
-
153
-
154
-
155
-
156
-
157
-
158
-
159
-
160
-
161
-
162
-
163
-
164
-
165
-
166
-
167
-
168
-
169
-
170
-
171
-
172
-
173
-
174
-
175
-
176
-
177
-
178
-
179
-
180
-
181
-
182
-
183
-
184
-
 185
185 -
 186
186 -
 187
187 -
 188
188 -
 189
189 -
 190
190 -
 191
191 -
 192
192 -
 193
193 -
 194
194 -
 195
195 -
196
-
197
-
198
-
199
-
200
-
201
-
202
-
203
-
204
-
205
-
206
-
207
-
208
-
209
-
210
-
211
-
212
-
213
-
214
-
215
-
216
-
217
-
218
-
219
-
220
-
221
-
222
-
223
-
224
-
225
-
226
-
227
-
228
-
229
-
230
-
231
-
232
-
233
-
234
-
235
-
236
-
237
-
238
-
239
-
240
 |
 |
