Sony DCR PC105 Operating Instructions - Page 191
Customizing your Camcorder, Changing the menu settings
 |
UPC - 027242629172
View all Sony DCR PC105 manuals
Add to My Manuals
Save this manual to your list of manuals |
Page 191 highlights
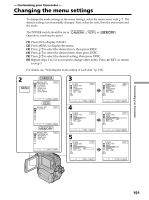
- Customizing your Camcorder - Changing the menu settings To change the mode settings in the menu settings, select the menu items with r/R . The default settings can be partially changed. First, select the icon, then the menu item and the mode. The POWER switch should be set to , or . Operate by touching the panel. (1) Press FN to display PAGE1. (2) Press MENU to display the menu. (3) Press r/R to select the desired icon, then press EXEC. (4) Press r/R to select the desired item, then press EXEC. (5) Press r/R to select the desired setting, then press EXEC. (6) Repeat steps 3 to 5 if you want to change other items. Press to step 3. RET. to return For details, see "Selecting the mode setting of each item" (p. 192). 2 MENU MANUAL SET EXIT PROGRAM AE P EFFECT RED EYE R FLASH LVL WHT BAL AUTO SHTR 3 OTHERS EXIT WORLD TIME BEEP COMMANDER DISPLAY REC LAMP OTHERS WORLD TIME BEEP COMMANDER DISPLAY REC LAMP EXIT 0 HR EXEC RET. MANUAL SET EXIT P EFFECT EXEC RET. MANUAL SET EXIT PROGRAM AE RED EYE R FLASH LVL WHT BAL EXEC RET. EXEC RET. 4 OTHERS EXIT WORLD TIME BEEP COMMANDER ON DISPLAY REC LAMP EXEC RET. 5 OTHERS EXIT WORLD TIME BEEP COMMANDER ON DISPLAY OFF REC LAMP EXEC RET. OTHERS EXIT WORLD TIME BEEP COMMANDER ON DISPLAY OFF REC LAMP EXEC RET. OTHERS EXIT WORLD TIME BEEP COMMANDER OFF DISPLAY REC LAMP EXEC RET. EXEC RET. Customizing your Camcorder 191
-
 1
1 -
2
-
3
-
4
-
5
-
6
-
7
-
8
-
9
-
10
-
11
-
12
-
13
-
14
-
15
-
16
-
17
-
18
-
19
-
20
-
21
-
22
-
23
-
24
-
25
-
26
-
27
-
28
-
29
-
30
-
31
-
32
-
33
-
34
-
35
-
36
-
37
-
38
-
39
-
40
-
41
-
42
-
43
-
44
-
45
-
46
-
47
-
48
-
49
-
50
-
51
-
52
-
53
-
54
-
55
-
56
-
57
-
58
-
59
-
60
-
61
-
62
-
63
-
64
-
65
-
66
-
67
-
68
-
69
-
70
-
71
-
72
-
73
-
74
-
75
-
76
-
77
-
78
-
79
-
80
-
81
-
82
-
83
-
84
-
85
-
86
-
87
-
88
-
89
-
90
-
91
-
92
-
93
-
94
-
95
-
96
-
97
-
98
-
99
-
100
-
101
-
102
-
103
-
104
-
105
-
106
-
107
-
108
-
109
-
110
-
111
-
112
-
113
-
114
-
115
-
116
-
117
-
118
-
119
-
120
-
121
-
122
-
123
-
124
-
125
-
126
-
127
-
128
-
129
-
130
-
131
-
132
-
133
-
134
-
135
-
136
-
137
-
138
-
139
-
140
-
141
-
142
-
143
-
144
-
145
-
146
-
147
-
148
-
149
-
150
-
151
-
152
-
153
-
154
-
155
-
156
-
157
-
158
-
159
-
160
-
161
-
162
-
163
-
164
-
165
-
166
-
167
-
168
-
169
-
170
-
171
-
172
-
173
-
174
-
175
-
176
-
177
-
178
-
179
-
180
-
181
-
182
-
183
-
184
-
185
-
 186
186 -
 187
187 -
 188
188 -
 189
189 -
 190
190 -
 191
191 -
 192
192 -
 193
193 -
 194
194 -
 195
195 -
 196
196 -
197
-
198
-
199
-
200
-
201
-
202
-
203
-
204
-
205
-
206
-
207
-
208
-
209
-
210
-
211
-
212
-
213
-
214
-
215
-
216
-
217
-
218
-
219
-
220
-
221
-
222
-
223
-
224
-
225
-
226
-
227
-
228
-
229
-
230
-
231
-
232
-
233
-
234
-
235
-
236
-
237
-
238
-
239
-
240
 |
 |
