Sony STR-DN1040 Operating Instructions (Large File - 14.3 MB) - Page 41
Preparing the Receiver, If you cannot find the, network name SSID you, want manual setup, method
 |
View all Sony STR-DN1040 manuals
Add to My Manuals
Save this manual to your list of manuals |
Page 41 highlights
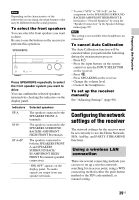
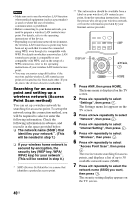
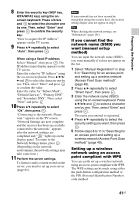
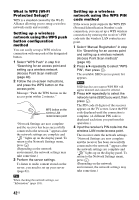
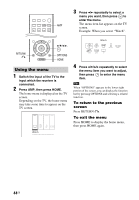
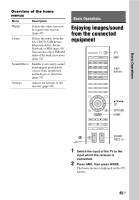
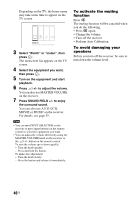
Preparing the Receiver 8 Enter the security key (WEP key, WPA/WPA2 key) using the onscreen keyboard. Press V/v/B/b and to select the character one by one. Then, select "Enter" and press to confirm the security key. "How to acquire the IP Address" appears on the TV screen. 9 Press V/v repeatedly to select "Auto", then press . When using a fixed IP address Select "Manual", then press . The IP address input display appears on the TV screen. Enter the value for "IP Address" using the on-screen keyboard. Press V/v/B/ b and to select the character one by one. Then, select "Enter" and press to confirm the value. Enter the value for "Subnet Mask", "Default Gateway", "Primary DNS" and "Secondary DNS". Then, select "Next" and press . 10 Press V/v repeatedly to select "Ok", then press . "Connecting to the network. Please wait." appears on the TV screen. "Network Settings are now complete and the receiver has been successfully connected to the network." appears after the network settings are completed and " " lights up on the display panel. To return to the Network Settings menu, press . (Depending on the network environment, the network settings may take some time.) 11 Perform the server settings. To listen to audio content stored on the server, you need to set up your server (page 61). Note If your network has not been secured by encryption (using the security key), the security setting display does not appear in step 8. Tip When checking the network settings, see "Information" (page 101). If you cannot find the network name (SSID) you want (manual setup method) You can input the network name (SSID) you want manually if it does not appear on the list. 1 Select "Manual Registration" in step 6 in "Searching for an access point and setting up a wireless network (Access Point Scan method)" (page 40). 2 Press V/v repeatedly to select "Direct Input", then press . 3 Enter the network name (SSID) using the on-screen keyboard. Press V/v/B/b and to select a character one by one. Then, select "Enter" and press . The name you entered is registered. 4 Press V/v repeatedly to select the security setting you want, then press . 5 Follow steps 8 to 11 in "Searching for an access point and setting up a wireless network (Access Point Scan method)" (page 40). Setting up a wireless network using an access point compliant with WPS You can easily set up a wireless network using an access point compliant with WPS. The WPS setting can be made using either the push-button configuration method or the PIN (Personal Identification Number) code method. 41US
-
 1
1 -
2
-
3
-
4
-
5
-
6
-
7
-
8
-
9
-
10
-
11
-
12
-
13
-
14
-
15
-
16
-
17
-
18
-
19
-
20
-
21
-
22
-
23
-
24
-
25
-
26
-
27
-
28
-
29
-
30
-
31
-
32
-
33
-
34
-
35
-
 36
36 -
 37
37 -
 38
38 -
 39
39 -
 40
40 -
 41
41 -
 42
42 -
 43
43 -
 44
44 -
 45
45 -
 46
46 -
47
-
48
-
49
-
50
-
51
-
52
-
53
-
54
-
55
-
56
-
57
-
58
-
59
-
60
-
61
-
62
-
63
-
64
-
65
-
66
-
67
-
68
-
69
-
70
-
71
-
72
-
73
-
74
-
75
-
76
-
77
-
78
-
79
-
80
-
81
-
82
-
83
-
84
-
85
-
86
-
87
-
88
-
89
-
90
-
91
-
92
-
93
-
94
-
95
-
96
-
97
-
98
-
99
-
100
-
101
-
102
-
103
-
104
-
105
-
106
-
107
-
108
-
109
-
110
-
111
-
112
-
113
-
114
-
115
-
116
-
117
-
118
-
119
-
120
-
121
-
122
-
123
-
124
-
125
-
126
-
127
-
128
-
129
-
130
-
131
-
132
-
133
-
134
-
135
-
136
 |
 |
