Sony STR-DN1040 Operating Instructions (Large File - 14.3 MB) - Page 87
Using a bi-amplifier connection, Other Operations
 |
View all Sony STR-DN1040 manuals
Add to My Manuals
Save this manual to your list of manuals |
Page 87 highlights
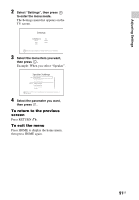
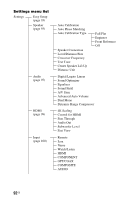
3 Select the input name you want to assign, then press . 4 Press B/b repeatedly to select "COMPONENT" or "OPT/COAX". 5 Press V/v repeatedly to select the jack you want to assign, then press . Input name BD DVD GAME SAT/ VIDEO VIDEO VIDEO SA-CD/ CATV 1 2 3 CD Assignable video IN2 input jacks IN1 a a* a aaa aa a a a a* a a a a None a* a a* a a* a* a* a* Assignable audio OPT 2 a a a input jacks OPT 1 a a a aa a a a a* a a a a COAX a a* a aa a a a None a* a a* a a* a* a* a* * Default setting Notes • When you assign the digital audio input, the INPUT MODE setting may change automatically. • One reassignment is allowed for each input. Using a bi-amplifier connection 1 Select "Settings" from the home menu, then press . The Settings menu list appears on the TV screen. 2 Select "Speaker", then press . 3 Select "Speaker Connection", then press . 4 Select the appropriate speaker pattern so that there are no surround back speakers and front high speakers, then press . 5 Select "Bi-Amplifier Connection", then press . The same signals output from the SPEAKERS FRONT A terminals can be output from the SPEAKERS SURROUND BACK/BI-AMP/ FRONT HIGH/FRONT B terminals. 6 Press to save the selection. To exit the menu Press HOME. Notes • Select "Bi-Amplifier Connection" before you perform Auto Calibration. • When you select "Bi-Amplifier Connection", the speaker level and distance settings of the surround back speakers and front high speakers become invalid, and those of the front speakers are used. 87US Other Operations
-
 1
1 -
2
-
3
-
4
-
5
-
6
-
7
-
8
-
9
-
10
-
11
-
12
-
13
-
14
-
15
-
16
-
17
-
18
-
19
-
20
-
21
-
22
-
23
-
24
-
25
-
26
-
27
-
28
-
29
-
30
-
31
-
32
-
33
-
34
-
35
-
36
-
37
-
38
-
39
-
40
-
41
-
42
-
43
-
44
-
45
-
46
-
47
-
48
-
49
-
50
-
51
-
52
-
53
-
54
-
55
-
56
-
57
-
58
-
59
-
60
-
61
-
62
-
63
-
64
-
65
-
66
-
67
-
68
-
69
-
70
-
71
-
72
-
73
-
74
-
75
-
76
-
77
-
78
-
79
-
80
-
81
-
 82
82 -
 83
83 -
 84
84 -
 85
85 -
 86
86 -
 87
87 -
 88
88 -
 89
89 -
 90
90 -
 91
91 -
 92
92 -
93
-
94
-
95
-
96
-
97
-
98
-
99
-
100
-
101
-
102
-
103
-
104
-
105
-
106
-
107
-
108
-
109
-
110
-
111
-
112
-
113
-
114
-
115
-
116
-
117
-
118
-
119
-
120
-
121
-
122
-
123
-
124
-
125
-
126
-
127
-
128
-
129
-
130
-
131
-
132
-
133
-
134
-
135
-
136
 |
 |
