Uniden BCD996P2 English Manual - Page 66
Gps Display Mode
 |
View all Uniden BCD996P2 manuals
Add to My Manuals
Save this manual to your list of manuals |
Page 66 highlights
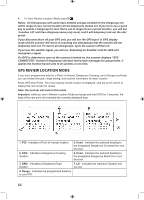
GPS DISPLAY MODE GPS Review Location Mode Edit Name the default name is P (POI), X (dangerous crossing), R (dangerous road), then YYMMDD hhmmss that indicates the year, month, date, and time you stored the location point with a GPS. 1. Scroll to 'Edit Name' and press E/ . See Entering Text. Set Type if you want to change the location type, the scanner resets the available options based on the new location type and the scanner goes back to the 'Program Location' menu for that location. 1. Scroll to 'Set Type' and press E/ . 2. At 'Select Type' scroll to 'POI', 'Dangerous Xing', or 'Dangerous Road' and press E/ to save and exit. Set Alert (POI only) lets you configure the alert tone and/or light when you are in range of a POI. The default tone is 'Alert 1', the default level is 'Auto', the default color is 'Cyan' and default pattern is 'Fast Blink'. 1. Scroll to 'Set Alert' and press E/ . 2. Scroll to 'Set Alert Tone' and press E/ . 3. At 'Set Tone' scroll to the alert (Alert 1-4 or Off) and press E/ . 4. At 'Set Level' scroll to 'Level 1-15 or Auto' (the scanner sets the alert beep to the master volume level) and press E/ . 5. Scroll to 'Set Alert Light' and press E/ . 6. Scroll to Off, Blue, Red, Magenta, Green, Cyan, Yellow, or White and press E/ . 7. At 'Set Pattern' scroll to On, Slow Blink, or Fast Blink and press E/ . 8. Press MENU to return. Set Alert Light (Dangerous Road/Xing only) lets you configure the alert light when you approach a location'. The default color is 'Cyan' and default pattern is 'Fast Blink'. 1. Scroll to 'Set Alert Light' and press E/ . 2. At 'Set Color' scroll to Off, Blue, Red, Magenta, Green, Cyan, Yellow, or White and press E/ 3. At 'Set Pattern' scroll to On, Slow Blink, or Fast Blink and press E/ . 4. Press MENU to return. 62
-
 1
1 -
2
-
3
-
4
-
5
-
6
-
7
-
8
-
9
-
10
-
11
-
12
-
13
-
14
-
15
-
16
-
17
-
18
-
19
-
20
-
21
-
22
-
23
-
24
-
25
-
26
-
27
-
28
-
29
-
30
-
31
-
32
-
33
-
34
-
35
-
36
-
37
-
38
-
39
-
40
-
41
-
42
-
43
-
44
-
45
-
46
-
47
-
48
-
49
-
50
-
51
-
52
-
53
-
54
-
55
-
56
-
57
-
58
-
59
-
60
-
 61
61 -
 62
62 -
 63
63 -
 64
64 -
 65
65 -
 66
66 -
 67
67 -
 68
68 -
 69
69 -
 70
70 -
 71
71 -
72
-
73
-
74
-
75
-
76
-
77
-
78
-
79
-
80
-
81
-
82
-
83
-
84
-
85
-
86
-
87
-
88
-
89
-
90
-
91
-
92
-
93
-
94
-
95
-
96
-
97
-
98
-
99
-
100
-
101
-
102
-
103
-
104
-
105
-
106
-
107
-
108
-
109
-
110
-
111
-
112
 |
 |