Brother International IntelliFax-3550 Service Manual - Page 64
If you touch it, clean it throughly with alcohol., When setting the FU lamp into the fixing unit
 |
View all Brother International IntelliFax-3550 manuals
Add to My Manuals
Save this manual to your list of manuals |
Page 64 highlights
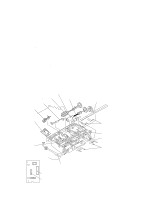
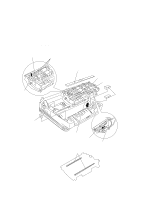
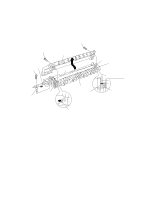
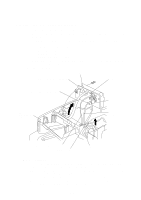
(7) Remove the screw "d" and loosen the screw "c." (8) Take the lock plate of the FU lamp with your fingers and pull out the FU lamp from the heater roller to the left. CAUTION: Never toutch the FU lamp. If you touch it, clean it throughly with alcohol. "b" "b" FU lamp "d" Upper cover Lower cover "c" (Loosen this.) Latch Setting the FU lamp Lock plate Latch Heater roller Insert the right edge of the wire into the folded lock plate. Folded lock plate Unhooking the latch s Reassembling Notes • When setting the FU lamp into the fixing unit, be sure to insert the right edge of the wire into the folded lock plate. • When installing the paper ejection sensor actuator, hook the spring as shown on the previous page. IV - 14
-
 1
1 -
2
-
3
-
4
-
5
-
6
-
7
-
8
-
9
-
10
-
11
-
12
-
13
-
14
-
15
-
16
-
17
-
18
-
19
-
20
-
21
-
22
-
23
-
24
-
25
-
26
-
27
-
28
-
29
-
30
-
31
-
32
-
33
-
34
-
35
-
36
-
37
-
38
-
39
-
40
-
41
-
42
-
43
-
44
-
45
-
46
-
47
-
48
-
49
-
50
-
51
-
52
-
53
-
54
-
55
-
56
-
57
-
58
-
 59
59 -
 60
60 -
 61
61 -
 62
62 -
 63
63 -
 64
64 -
 65
65 -
 66
66 -
 67
67 -
 68
68 -
 69
69 -
70
-
71
-
72
-
73
-
74
-
75
-
76
-
77
-
78
-
79
-
80
-
81
-
82
-
83
-
84
-
85
-
86
-
87
-
88
-
89
-
90
-
91
-
92
-
93
-
94
-
95
-
96
-
97
-
98
-
99
-
100
-
101
-
102
-
103
-
104
-
105
-
106
-
107
-
108
-
109
-
110
-
111
-
112
-
113
-
114
-
115
-
116
-
117
-
118
-
119
-
120
-
121
-
122
-
123
-
124
-
125
-
126
-
127
-
128
-
129
-
130
-
131
-
132
-
133
-
134
-
135
-
136
-
137
-
138
-
139
-
140
-
141
-
142
-
143
-
144
-
145
-
146
-
147
-
148
-
149
-
150
-
151
-
152
-
153
-
154
-
155
-
156
-
157
-
158
-
159
-
160
-
161
-
162
-
163
-
164
-
165
-
166
-
167
-
168
-
169
-
170
-
171
-
172
-
173
-
174
-
175
-
176
-
177
-
178
-
179
-
180
-
181
-
182
-
183
-
184
-
185
-
186
-
187
-
188
-
189
-
190
-
191
 |
 |

IV –
14
(7)
Remove the screw "d" and loosen the screw "c."
(8)
Take the lock plate of the FU lamp with your fingers and pull out the FU lamp from the
heater roller to the left.
CAUTION:
Never toutch the FU lamp.
If you touch it, clean it throughly with alcohol.
Setting the FU lamp
Folded lock
plate
Latch
"c"
(Loosen this.)
Heater roller
Insert the right
edge of the wire
into the folded
lock plate.
Unhooking the latch
Latch
Lock plate
"d"
FU lamp
"b"
Lower cover
Upper cover
"b"
■
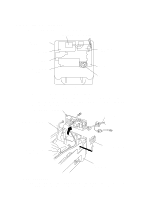
Reassembling Notes
•
When setting the FU lamp into the fixing unit, be sure to insert the right edge of the wire
into the folded lock plate.
•
When installing the paper ejection sensor actuator, hook the spring as shown on the pre-
vious page.