Canon 9685A001AA PowerShot G6 Camera User Guide - Page 101
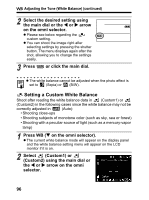
Aim the camera at the white paper or cloth, or gray, card and press the SET button., Press, or click
 |
UPC - 013803043457
View all Canon 9685A001AA manuals
Add to My Manuals
Save this manual to your list of manuals |
Page 101 highlights
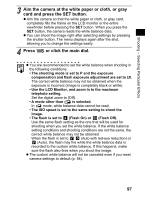
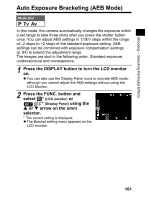
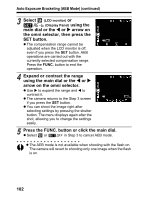
Shooting - Selecting Particular Effects 3 Aim the camera at the white paper or cloth, or gray card and press the SET button. z Aim the camera so that the white paper or cloth, or gray card, completely fills the frame on the LCD monitor or the entire viewfinder before pressing the SET button. When you press the SET button, the camera reads the white balance data. z You can shoot the image right after selecting settings by pressing the shutter button. The menu displays again after the shot, allowing you to change the settings easily. 4 Press or click the main dial. z You are recommended to set the white balance when shooting in the following conditions. • The shooting mode is set to P and the exposure compensation and flash exposure adjustment are set to ±0. The correct white balance may not be obtained when the exposure is incorrect (image is completely black or white). • Use the LCD Monitor, and zoom in to the maximum telephoto setting. Set the digital zoom to [Off]. • A mode other than is selected. In mode, white balance data cannot be read. • The ISO speed is set to the same setting to shoot the image. • The flash is set to (Flash On) or (Flash Off). Use the same flash setting as the one that will be used for shooting when you set the white balance. If the white balance setting conditions and shooting conditions are not the same, the correct white balance may not be obtained. When the flash is set to (Auto with red-eye reduction) or (Auto), the flash may fire while the white balance data is recorded to the custom white balance. If this happens, make sure the flash also fires when you shoot the image. z The custom white balance will not be canceled even if you reset camera settings to default (p. 54). 97
-
 1
1 -
2
-
3
-
4
-
5
-
6
-
7
-
8
-
9
-
10
-
11
-
12
-
13
-
14
-
15
-
16
-
17
-
18
-
19
-
20
-
21
-
22
-
23
-
24
-
25
-
26
-
27
-
28
-
29
-
30
-
31
-
32
-
33
-
34
-
35
-
36
-
37
-
38
-
39
-
40
-
41
-
42
-
43
-
44
-
45
-
46
-
47
-
48
-
49
-
50
-
51
-
52
-
53
-
54
-
55
-
56
-
57
-
58
-
59
-
60
-
61
-
62
-
63
-
64
-
65
-
66
-
67
-
68
-
69
-
70
-
71
-
72
-
73
-
74
-
75
-
76
-
77
-
78
-
79
-
80
-
81
-
82
-
83
-
84
-
85
-
86
-
87
-
88
-
89
-
90
-
91
-
92
-
93
-
94
-
95
-
 96
96 -
 97
97 -
 98
98 -
 99
99 -
 100
100 -
 101
101 -
 102
102 -
 103
103 -
 104
104 -
 105
105 -
 106
106 -
107
-
108
-
109
-
110
-
111
-
112
-
113
-
114
-
115
-
116
-
117
-
118
-
119
-
120
-
121
-
122
-
123
-
124
-
125
-
126
-
127
-
128
-
129
-
130
-
131
-
132
-
133
-
134
-
135
-
136
-
137
-
138
-
139
-
140
-
141
-
142
-
143
-
144
-
145
-
146
-
147
-
148
-
149
-
150
-
151
-
152
-
153
-
154
-
155
-
156
-
157
-
158
-
159
-
160
-
161
-
162
-
163
-
164
-
165
-
166
-
167
-
168
-
169
-
170
-
171
-
172
-
173
-
174
-
175
-
176
-
177
-
178
-
179
-
180
-
181
-
182
-
183
-
184
-
185
-
186
-
187
-
188
-
189
-
190
-
191
-
192
-
193
-
194
-
195
-
196
-
197
-
198
-
199
-
200
-
201
-
202
-
203
-
204
-
205
-
206
-
207
-
208
-
209
-
210
-
211
 |
 |