Canon 9685A001AA PowerShot G6 Camera User Guide - Page 89
Setting the Aperture
 |
UPC - 013803043457
View all Canon 9685A001AA manuals
Add to My Manuals
Save this manual to your list of manuals |
Page 89 highlights
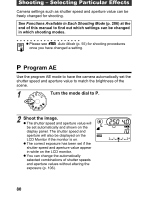
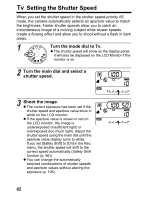
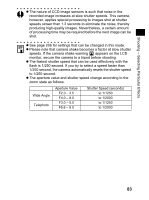
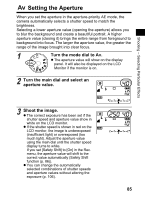
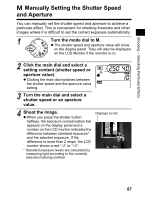
Shooting - Selecting Particular Effects Setting the Aperture When you set the aperture in the aperture-priority AE mode, the camera automatically selects a shutter speed to match the brightness. Selecting a lower aperture value (opening the aperture) allows you to blur the background and create a beautiful portrait. A higher aperture value (closing it) brings the entire range from foreground to background into focus. The larger the aperture value, the greater the range of the image brought into clear focus. 1 Turn the mode dial to Av. z The aperture value will show on the display panel. It will also be displayed on the LCD Monitor if the monitor is on. 2 Turn the main dial and select an aperture value. 3 Shoot the image. z The correct exposure has been set if the shutter speed and aperture value show in white on the LCD monitor. z If the shutter speed is shown in red on the LCD monitor, the image is underexposed (insufficient light) or overexposed (too much light). Adjust the aperture value using the main dial until the shutter speed display turns to white. If you set [Safety Shift] to [On] in the Rec. menu, the aperture value will shift to the correct value automatically (Safety Shift function (p. 86)). z You can change the automatically selected combinations of shutter speeds and aperture values without altering the exposure (p. 106). 85
-
 1
1 -
2
-
3
-
4
-
5
-
6
-
7
-
8
-
9
-
10
-
11
-
12
-
13
-
14
-
15
-
16
-
17
-
18
-
19
-
20
-
21
-
22
-
23
-
24
-
25
-
26
-
27
-
28
-
29
-
30
-
31
-
32
-
33
-
34
-
35
-
36
-
37
-
38
-
39
-
40
-
41
-
42
-
43
-
44
-
45
-
46
-
47
-
48
-
49
-
50
-
51
-
52
-
53
-
54
-
55
-
56
-
57
-
58
-
59
-
60
-
61
-
62
-
63
-
64
-
65
-
66
-
67
-
68
-
69
-
70
-
71
-
72
-
73
-
74
-
75
-
76
-
77
-
78
-
79
-
80
-
81
-
82
-
83
-
 84
84 -
 85
85 -
 86
86 -
 87
87 -
 88
88 -
 89
89 -
 90
90 -
 91
91 -
 92
92 -
 93
93 -
 94
94 -
95
-
96
-
97
-
98
-
99
-
100
-
101
-
102
-
103
-
104
-
105
-
106
-
107
-
108
-
109
-
110
-
111
-
112
-
113
-
114
-
115
-
116
-
117
-
118
-
119
-
120
-
121
-
122
-
123
-
124
-
125
-
126
-
127
-
128
-
129
-
130
-
131
-
132
-
133
-
134
-
135
-
136
-
137
-
138
-
139
-
140
-
141
-
142
-
143
-
144
-
145
-
146
-
147
-
148
-
149
-
150
-
151
-
152
-
153
-
154
-
155
-
156
-
157
-
158
-
159
-
160
-
161
-
162
-
163
-
164
-
165
-
166
-
167
-
168
-
169
-
170
-
171
-
172
-
173
-
174
-
175
-
176
-
177
-
178
-
179
-
180
-
181
-
182
-
183
-
184
-
185
-
186
-
187
-
188
-
189
-
190
-
191
-
192
-
193
-
194
-
195
-
196
-
197
-
198
-
199
-
200
-
201
-
202
-
203
-
204
-
205
-
206
-
207
-
208
-
209
-
210
-
211
 |
 |
