Canon 9685A001AA PowerShot G6 Camera User Guide - Page 45
Using the Optical Viewfinder to Shoot
 |
UPC - 013803043457
View all Canon 9685A001AA manuals
Add to My Manuals
Save this manual to your list of manuals |
Page 45 highlights
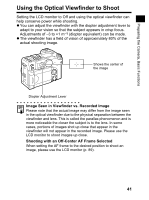
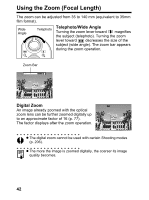
Preparing the Camera, Basic Functions Using the Optical Viewfinder to Shoot Setting the LCD monitor to Off and using the optical viewfinder can help conserve power while shooting. z You can adjust the viewfinder with the diopter adjustment lever to adapt to your vision so that the subject appears in crisp focus. Adjustments of -3 to +1 m-1 (diopter equivalent) can be made. z The viewfinder has a field of vision of approximately 80% of the actual shooting image. Shows the center of the image Diopter Adjustment Lever Image Seen in Viewfinder vs. Recorded Image Please note that the actual image may differ from the image seen in the optical viewfinder due to the physical separation between the viewfinder and lens. This is called the parallax phenomenon and is more noticeable the closer the subject is to the lens. In some cases, portions of images shot up close that appear in the viewfinder will not appear in the recorded image. Please use the LCD monitor to shoot images up close. Shooting with an Off-Center AF Frame Selected When setting the AF frame to the desired position to shoot an image, please use the LCD monitor (p. 89). 41
-
 1
1 -
2
-
3
-
4
-
5
-
6
-
7
-
8
-
9
-
10
-
11
-
12
-
13
-
14
-
15
-
16
-
17
-
18
-
19
-
20
-
21
-
22
-
23
-
24
-
25
-
26
-
27
-
28
-
29
-
30
-
31
-
32
-
33
-
34
-
35
-
36
-
37
-
38
-
39
-
 40
40 -
 41
41 -
 42
42 -
 43
43 -
 44
44 -
 45
45 -
 46
46 -
 47
47 -
 48
48 -
 49
49 -
 50
50 -
51
-
52
-
53
-
54
-
55
-
56
-
57
-
58
-
59
-
60
-
61
-
62
-
63
-
64
-
65
-
66
-
67
-
68
-
69
-
70
-
71
-
72
-
73
-
74
-
75
-
76
-
77
-
78
-
79
-
80
-
81
-
82
-
83
-
84
-
85
-
86
-
87
-
88
-
89
-
90
-
91
-
92
-
93
-
94
-
95
-
96
-
97
-
98
-
99
-
100
-
101
-
102
-
103
-
104
-
105
-
106
-
107
-
108
-
109
-
110
-
111
-
112
-
113
-
114
-
115
-
116
-
117
-
118
-
119
-
120
-
121
-
122
-
123
-
124
-
125
-
126
-
127
-
128
-
129
-
130
-
131
-
132
-
133
-
134
-
135
-
136
-
137
-
138
-
139
-
140
-
141
-
142
-
143
-
144
-
145
-
146
-
147
-
148
-
149
-
150
-
151
-
152
-
153
-
154
-
155
-
156
-
157
-
158
-
159
-
160
-
161
-
162
-
163
-
164
-
165
-
166
-
167
-
168
-
169
-
170
-
171
-
172
-
173
-
174
-
175
-
176
-
177
-
178
-
179
-
180
-
181
-
182
-
183
-
184
-
185
-
186
-
187
-
188
-
189
-
190
-
191
-
192
-
193
-
194
-
195
-
196
-
197
-
198
-
199
-
200
-
201
-
202
-
203
-
204
-
205
-
206
-
207
-
208
-
209
-
210
-
211
 |
 |