Canon 9685A001AA PowerShot G6 Camera User Guide - Page 61
Reviewing an Image Right after Shooting
 |
UPC - 013803043457
View all Canon 9685A001AA manuals
Add to My Manuals
Save this manual to your list of manuals |
Page 61 highlights
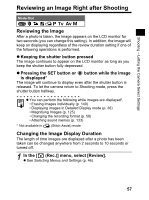
Shooting - Letting the Camera Select Settings Reviewing an Image Right after Shooting Mode Dial Reviewing the Image After a photo is taken, the image appears on the LCD monitor for two seconds (you can change this setting). In addition, the image will keep on displaying regardless of the review duration setting if one of the following operations is performed. z Keeping the shutter button pressed The image continues to appear on the LCD monitor as long as you keep the shutter button fully depressed. z Pressing the SET button or button while the image is displayed* The image will continue to display even after the shutter button is released. To let the camera return to Shooting mode, press the shutter button halfway. z You can perform the following while images are displayed*. • Erasing images individually (p. 140) • Displaying images in Detailed Display mode (p. 36) • Magnifying Images (p. 125) • Changing the recording format (p. 58) • Attaching sound memos (p. 133) * Not available in (Stitch Assist) mode. Changing the Image Display Duration The length of time images are displayed after a photo has been taken can be changed anywhere from 2 seconds to 10 seconds or turned off. 1 In the [ (Rec.)] menu, select [Review]. z See Selecting Menus and Settings (p. 46). 57
-
 1
1 -
2
-
3
-
4
-
5
-
6
-
7
-
8
-
9
-
10
-
11
-
12
-
13
-
14
-
15
-
16
-
17
-
18
-
19
-
20
-
21
-
22
-
23
-
24
-
25
-
26
-
27
-
28
-
29
-
30
-
31
-
32
-
33
-
34
-
35
-
36
-
37
-
38
-
39
-
40
-
41
-
42
-
43
-
44
-
45
-
46
-
47
-
48
-
49
-
50
-
51
-
52
-
53
-
54
-
55
-
 56
56 -
 57
57 -
 58
58 -
 59
59 -
 60
60 -
 61
61 -
 62
62 -
 63
63 -
 64
64 -
 65
65 -
 66
66 -
67
-
68
-
69
-
70
-
71
-
72
-
73
-
74
-
75
-
76
-
77
-
78
-
79
-
80
-
81
-
82
-
83
-
84
-
85
-
86
-
87
-
88
-
89
-
90
-
91
-
92
-
93
-
94
-
95
-
96
-
97
-
98
-
99
-
100
-
101
-
102
-
103
-
104
-
105
-
106
-
107
-
108
-
109
-
110
-
111
-
112
-
113
-
114
-
115
-
116
-
117
-
118
-
119
-
120
-
121
-
122
-
123
-
124
-
125
-
126
-
127
-
128
-
129
-
130
-
131
-
132
-
133
-
134
-
135
-
136
-
137
-
138
-
139
-
140
-
141
-
142
-
143
-
144
-
145
-
146
-
147
-
148
-
149
-
150
-
151
-
152
-
153
-
154
-
155
-
156
-
157
-
158
-
159
-
160
-
161
-
162
-
163
-
164
-
165
-
166
-
167
-
168
-
169
-
170
-
171
-
172
-
173
-
174
-
175
-
176
-
177
-
178
-
179
-
180
-
181
-
182
-
183
-
184
-
185
-
186
-
187
-
188
-
189
-
190
-
191
-
192
-
193
-
194
-
195
-
196
-
197
-
198
-
199
-
200
-
201
-
202
-
203
-
204
-
205
-
206
-
207
-
208
-
209
-
210
-
211
 |
 |
