Canon PowerShot A75 Software starter Guide Ver.16/17 - Page 19
Using the Software on the Windows, Platform - The Basics
 |
View all Canon PowerShot A75 manuals
Add to My Manuals
Save this manual to your list of manuals |
Page 19 highlights
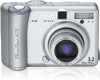
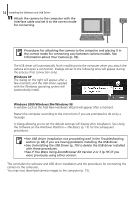
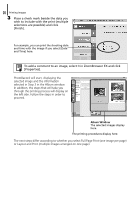
15 Using the Software on the Windows Platform - The Basics This chapter explains the procedures for using ZoomBrowser EX to download the camera's images to the computer and print them. Read this chapter after completing the preparations in the Using the Software on the Windows Platform - Preparations section. Downloading Images to the Computer Begin by starting up ZoomBrowser EX and downloading images to your computer. The startup procedures vary slightly according to whether you are connecting the camera to the computer or using a memory card reader. • See Information about Your Camera (p. 92) to confirm whether your camera model supports the Direct Transfer function. • You can change the settings for the images to be downloaded and the downloading destination by clicking the [Camera] menu in ZoomBrowser EX's main window and selecting [Auto-download setting]. • You can also display an index of the camera or memory card images to check them before downloading or download them selectively. For instructions, see Checking Images before Downloading (p. 26). A window stating that the server is busy may display while images are downloading. If this happens, wait a moment and click the [Retry] button (p. 90). Camera to Computer Connection 1 Attach the supplied interface cable to the computer's USB port and the camera's Digital Terminal. Prepare the camera for communication with the computer. Procedures for attaching the camera to the computer and placing it in the correct mode for connecting vary between camera models. See Information about Your Camera (p. 92).
-
 1
1 -
2
-
3
-
4
-
5
-
6
-
7
-
8
-
9
-
10
-
11
-
12
-
13
-
 14
14 -
 15
15 -
 16
16 -
 17
17 -
 18
18 -
 19
19 -
 20
20 -
 21
21 -
 22
22 -
 23
23 -
 24
24 -
25
-
26
-
27
-
28
-
29
-
30
-
31
-
32
-
33
-
34
-
35
-
36
-
37
-
38
-
39
-
40
-
41
-
42
-
43
-
44
-
45
-
46
-
47
-
48
-
49
-
50
-
51
-
52
-
53
-
54
-
55
-
56
-
57
-
58
-
59
-
60
-
61
-
62
-
63
-
64
-
65
-
66
-
67
-
68
-
69
-
70
-
71
-
72
-
73
-
74
-
75
-
76
-
77
-
78
-
79
-
80
-
81
-
82
-
83
-
84
-
85
-
86
-
87
-
88
-
89
-
90
-
91
-
92
-
93
-
94
-
95
-
96
-
97
-
98
-
99
-
100
-
101
-
102
-
103
-
104
-
105
-
106
 |
 |
