Canon PowerShot A75 Software starter Guide Ver.16/17 - Page 64
Correction Settings].
 |
View all Canon PowerShot A75 manuals
Add to My Manuals
Save this manual to your list of manuals |
Page 64 highlights
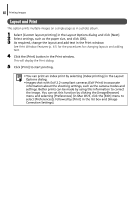
60 Printing Images Layout and Print This option prints multiple images on a single page as in a photo album. 1 Select [Custom layout printing] in the Layout Options dialog and click [Next]. 2 Select settings, such as the paper size, and click [OK]. 3 As required, change the layout and add text in the Print window. See Print Window Features (p. 61) for the procedures for changing layouts and adding text. 4 Click the [Print] button in the Print window. This will display the Print dialog. 5 Click [Print] to start printing. • You can print an index print by selecting [Index printing] in the Layout Options dialog. • Images shot with Exif 2.2-compliant cameras (Exif Print) incorporate information about the shooting settings, such as the camera modes and settings. Better prints can be made by using this information to correct the image. You can set this function by clicking the [ImageBrowser] menu and selecting [Preferences] (in Mac OS 9, click the [Edit] menu to select [Preferences]), followed by [Print] in the list box and [Image Correction Settings].
-
 1
1 -
2
-
3
-
4
-
5
-
6
-
7
-
8
-
9
-
10
-
11
-
12
-
13
-
14
-
15
-
16
-
17
-
18
-
19
-
20
-
21
-
22
-
23
-
24
-
25
-
26
-
27
-
28
-
29
-
30
-
31
-
32
-
33
-
34
-
35
-
36
-
37
-
38
-
39
-
40
-
41
-
42
-
43
-
44
-
45
-
46
-
47
-
48
-
49
-
50
-
51
-
52
-
53
-
54
-
55
-
56
-
57
-
58
-
 59
59 -
 60
60 -
 61
61 -
 62
62 -
 63
63 -
 64
64 -
 65
65 -
 66
66 -
 67
67 -
 68
68 -
 69
69 -
70
-
71
-
72
-
73
-
74
-
75
-
76
-
77
-
78
-
79
-
80
-
81
-
82
-
83
-
84
-
85
-
86
-
87
-
88
-
89
-
90
-
91
-
92
-
93
-
94
-
95
-
96
-
97
-
98
-
99
-
100
-
101
-
102
-
103
-
104
-
105
-
106
 |
 |