Canon PowerShot A75 Software starter Guide Ver.16/17 - Page 54
Using the Software on the Macintosh, Platform - The Basics
 |
View all Canon PowerShot A75 manuals
Add to My Manuals
Save this manual to your list of manuals |
Page 54 highlights
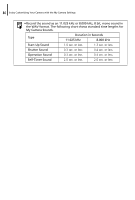
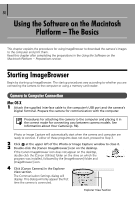
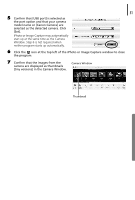
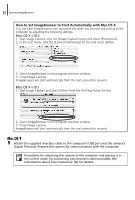
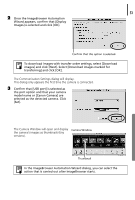
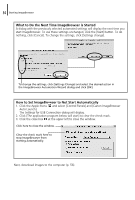
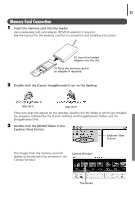
50 Using the Software on the Macintosh Platform - The Basics This chapter explains the procedures for using ImageBrowser to download the camera's images to the computer and print them. Read this chapter after completing the preparations in the Using the Software on the Macintosh Platform - Preparations section. Starting ImageBrowser Begin by starting up ImageBrowser. The startup procedures vary according to whether you are connecting the camera to the computer or using a memory card reader. Camera to Computer Connection Mac OS X 1 Attach the supplied interface cable to the computer's USB port and the camera's Digital Terminal. Prepare the camera for communication with the computer. Procedures for attaching the camera to the computer and placing it in the correct mode for connecting vary between camera models. See Information about Your Camera (p. 92). iPhoto or Image Capture will automatically start when the camera and computer are ready to connect. If either of these programs does not start, proceed to Step 3. 2 Click at the upper left of the iPhoto or Image Capture window to close it. 3 Double-click the [Canon ImageBrowser] icon on the desktop. If the Canon ImageBrowser icon does not appear on the desktop, double-click the [Canon Utilities] folder on the drive on which the program was installed, followed by the [ImageBrowser] folder and [ImageBrowser] icon. 4 Click [Canon Camera] in the Explorer View section. The Communication Settings dialog will display. This dialog will only appear the first time the camera is connected. Explorer View Section
-
 1
1 -
2
-
3
-
4
-
5
-
6
-
7
-
8
-
9
-
10
-
11
-
12
-
13
-
14
-
15
-
16
-
17
-
18
-
19
-
20
-
21
-
22
-
23
-
24
-
25
-
26
-
27
-
28
-
29
-
30
-
31
-
32
-
33
-
34
-
35
-
36
-
37
-
38
-
39
-
40
-
41
-
42
-
43
-
44
-
45
-
46
-
47
-
48
-
 49
49 -
 50
50 -
 51
51 -
 52
52 -
 53
53 -
 54
54 -
 55
55 -
 56
56 -
 57
57 -
 58
58 -
 59
59 -
60
-
61
-
62
-
63
-
64
-
65
-
66
-
67
-
68
-
69
-
70
-
71
-
72
-
73
-
74
-
75
-
76
-
77
-
78
-
79
-
80
-
81
-
82
-
83
-
84
-
85
-
86
-
87
-
88
-
89
-
90
-
91
-
92
-
93
-
94
-
95
-
96
-
97
-
98
-
99
-
100
-
101
-
102
-
103
-
104
-
105
-
106
 |
 |