Creative 70EM896106000 Owners Manual - Page 103
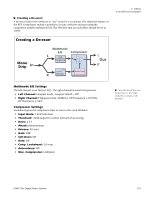
To Setup & Use E-MU PowerFX, Setup Cubase or Cubasis, Setup E-MU PowerFX
 |
UPC - 054651126893
View all Creative 70EM896106000 manuals
Add to My Manuals
Save this manual to your list of manuals |
Page 103 highlights
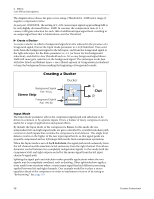
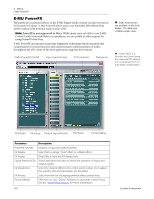
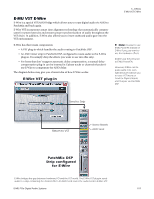
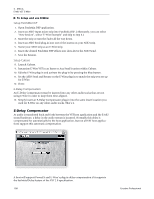
Parameter Preferences Description The Preferences menu allows you to: • Toggle the Tooltips On or Off • Extra Buffers - Check this box if excessive stuttering occurs when using E-MU PowerFX in your VST Host application. This box should be checked when using Fruity Loops. • Render Mode - Induces realtime rendering in applications which do not support realtime rendering (WaveLab, SoundForge). 5 - Effects E-MU PowerFX To Setup & Use E-MU PowerFX: Setup Cubase or Cubasis 1. Launch Cubase or Cubasis. 2. Instantiate E-MU PowerFX in an Insert or Aux Send location within Cubase. 3. Press the Insert Edit button in Cubase to bring up the E-MU PowerFX plug-in window shown on the previous page. Setup E-MU PowerFX 4. Make sure the blue button is illuminated, indicating that E-MU Power FX is on. The blue "Signal Present" indicators will be illuminated if E-MU PowerFX is properly patched into a signal path. 5. Drag the desired effects from the Effects Palette to the center Insert strip. 6. Click on the Effect you wish to edit in the center Insert Strip (it will highlight in yellow), then adjust the effects parameters in the right section of the window. 7. You can also select or edit User Presets from the section below the FX parameters. See the "User Preset Section" for more information. Add Delay Compensation (if needed) If you are using Cubase VST 5.1, you will have to insert an E-Delay Compensator into any other audio tracks to keep them time-aligned. 8. Simply insert an E-Delay Compensator plug-in into the same insert location you used for E-MU PowerFX on any other audio tracks. That's it. Using any driver other than "E-MU ASIO" may produce undesirable results when using E-MU PowerFX. E-MU PCIe Digital Audio Systems 103
-
 1
1 -
2
-
3
-
4
-
5
-
6
-
7
-
8
-
9
-
10
-
11
-
12
-
13
-
14
-
15
-
16
-
17
-
18
-
19
-
20
-
21
-
22
-
23
-
24
-
25
-
26
-
27
-
28
-
29
-
30
-
31
-
32
-
33
-
34
-
35
-
36
-
37
-
38
-
39
-
40
-
41
-
42
-
43
-
44
-
45
-
46
-
47
-
48
-
49
-
50
-
51
-
52
-
53
-
54
-
55
-
56
-
57
-
58
-
59
-
60
-
61
-
62
-
63
-
64
-
65
-
66
-
67
-
68
-
69
-
70
-
71
-
72
-
73
-
74
-
75
-
76
-
77
-
78
-
79
-
80
-
81
-
82
-
83
-
84
-
85
-
86
-
87
-
88
-
89
-
90
-
91
-
92
-
93
-
94
-
95
-
96
-
97
-
 98
98 -
 99
99 -
 100
100 -
 101
101 -
 102
102 -
 103
103 -
 104
104 -
 105
105 -
 106
106 -
 107
107 -
 108
108 -
109
-
110
-
111
-
112
-
113
-
114
-
115
-
116
-
117
-
118
-
119
-
120
-
121
-
122
-
123
-
124
-
125
-
126
-
127
-
128
-
129
-
130
-
131
-
132
 |
 |