Creative 70EM896106000 Owners Manual - Page 34
Using External Clock, I/O Settings - commons
 |
UPC - 054651126893
View all Creative 70EM896106000 manuals
Add to My Manuals
Save this manual to your list of manuals |
Page 34 highlights
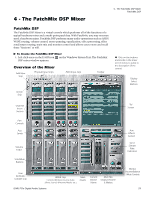
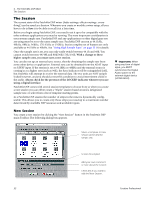
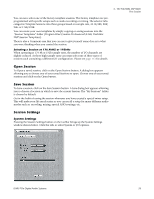
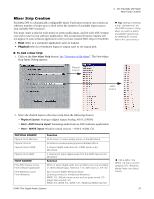
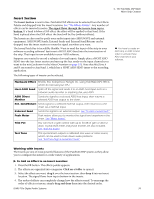
4 - The PatchMix DSP Mixer The Session The System Settings include the following: • Internal/External Clock Selects between internal or external word clock source as the master clock source for the system • Sample Rate Selects the sample rate when using internal clock. Your choices are: 44.1kHz, 48kHz, 88.2kHz, 96kHz, 176.4kHz, 192kHz. • External Clock Source Select from: ADAT, or S/PDIF as an external sample (ext. clock only) clock source. Using External Clock Whenever you are using any digital I/O such as ADAT or S/PDIF, one of the digital devices MUST supply the master clock to the others. This master clock runs at the system sample rate and can be embedded into a data stream such as S/PDIF or ADAT. Common symptoms of unsynced digital audio include, random clicks or pops in the audio or failure of the digital stream to be recognized. Always check for the presence of the "LOCKED" indicator whenever you are using a digital interface. If an External Clock is interrupted or switched after the Session has been created (except between 44.1k 48k), the "LOCKED" indicator will be extinguished and PatchMix will attempt to receive the external data. The two units are NOT sample locked however, and you should correct this condition to avoid intermittent clicks in the audio. I/O Settings You can set the level (-10dBV or +4 dBu) for each pair of analog outputs and the input gain setting for each pair of analog inputs. An output setting of +4 provides the most output and is compatible with professional audio gear. Balanced output cables also provide a +6dB hotter signal than unbalanced cables when used with balanced inputs. Do NOT use balanced cables unless your other gear has balanced inputs. See "Cables - balanced or unbalanced?" in the Appendix for more information. Comparison of -10dBV & +4dBu Signal Levels Note: if set to "External" without an external clock present, PatchMix DSP defaults to the internal 48kHz clock rate. 0 dBV = 1V RMS 0dBu = .777V RMS An input setting of -10 is compatible with consumer audio gear and works best with low level signals. (-10dBV is approximately 12dB lower than +4dBu.) Choose the setting that allows you to send or receive a full scale signal without clipping. Setting correct input and output levels is important! You can measure the level of an input by inserting a meter into the first effect location in the strip. Adjust your external equipment outputs for the optimum signal level. See "To Set the Input Levels of a Strip" for details. 34 Input too weak? Use -10 Input setting. Output too weak? Use +4 Output setting Creative Professional
-
 1
1 -
2
-
3
-
4
-
5
-
6
-
7
-
8
-
9
-
10
-
11
-
12
-
13
-
14
-
15
-
16
-
17
-
18
-
19
-
20
-
21
-
22
-
23
-
24
-
25
-
26
-
27
-
28
-
 29
29 -
 30
30 -
 31
31 -
 32
32 -
 33
33 -
 34
34 -
 35
35 -
 36
36 -
 37
37 -
 38
38 -
 39
39 -
40
-
41
-
42
-
43
-
44
-
45
-
46
-
47
-
48
-
49
-
50
-
51
-
52
-
53
-
54
-
55
-
56
-
57
-
58
-
59
-
60
-
61
-
62
-
63
-
64
-
65
-
66
-
67
-
68
-
69
-
70
-
71
-
72
-
73
-
74
-
75
-
76
-
77
-
78
-
79
-
80
-
81
-
82
-
83
-
84
-
85
-
86
-
87
-
88
-
89
-
90
-
91
-
92
-
93
-
94
-
95
-
96
-
97
-
98
-
99
-
100
-
101
-
102
-
103
-
104
-
105
-
106
-
107
-
108
-
109
-
110
-
111
-
112
-
113
-
114
-
115
-
116
-
117
-
118
-
119
-
120
-
121
-
122
-
123
-
124
-
125
-
126
-
127
-
128
-
129
-
130
-
131
-
132
 |
 |
