Creative 70EM896106000 Owners Manual - Page 27
Front, Right, Center, Sub-Woofer, 1 Surround Speaker Connections
 |
UPC - 054651126893
View all Creative 70EM896106000 manuals
Add to My Manuals
Save this manual to your list of manuals |
Page 27 highlights
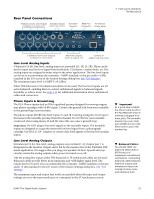
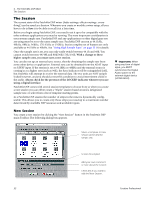
5.1 Surround Speaker Connections Left Front 1L 1R In Out 1L 1R 2L 2R 2L 2R Center 2L Phono 2R Gnd MIDI Cable 3L 3R Out 1 2 3 3 - PCIe Card & Interfaces The MicroDock Right 48 VDC + - Front EDI Left Rear Sub-Woofer (with built-in power amps) Front Rear Ctr/Sub The 1/8" stereo jacks make it easy to connect to powered surround sound speakers. Only three stereo cables are necessary with many speaker systems (see above). The 1/8" jacks duplicate the 1/4" outputs. The 1/8" jacks and the 1/4" jacks can be used simultaneously. You can connect the 1/8" stereo jacks to your surround speakers and connect the 1/4" outputs to your other gear for music creation. (Yes, they can both be connected at the same time.) When you want to monitor in surround, simply open the 5.1 Session and turn on your surround speakers. The chart below shows how to connect the outputs for 5.1 surround sound playback. Multichannel WAVE to Surround Sound Speaker Channels (using the factory 5.1 DVD Playback Session) WAVE Strip Surround Channels 1/4" Outputs 1/8" Outputs E-DSP WAVE 1/2 Front Left/Front Right 1L = FL 1R = FR 1 (Tip = FL Ring = FR) E-DSP WAVE 3/4 Center/Subwoofer 3L = C 3R = Sub 3 (Tip = C Ring = Sub) E-DSP WAVE 5/6 Rear Left/Rear Right 2L = RL 2R = RR 2 (Tip = RL Ring = RR) E-DSP WAVE 7/8 Side Left/Side Right N/A N/A Choose one of the DVD 5.1 Sessions, then set up your DVD application to use multichannel WAV for audio. E-MU PCIe Digital Audio Systems Right Rear 27
-
 1
1 -
2
-
3
-
4
-
5
-
6
-
7
-
8
-
9
-
10
-
11
-
12
-
13
-
14
-
15
-
16
-
17
-
18
-
19
-
20
-
21
-
 22
22 -
 23
23 -
 24
24 -
 25
25 -
 26
26 -
 27
27 -
 28
28 -
 29
29 -
 30
30 -
 31
31 -
 32
32 -
33
-
34
-
35
-
36
-
37
-
38
-
39
-
40
-
41
-
42
-
43
-
44
-
45
-
46
-
47
-
48
-
49
-
50
-
51
-
52
-
53
-
54
-
55
-
56
-
57
-
58
-
59
-
60
-
61
-
62
-
63
-
64
-
65
-
66
-
67
-
68
-
69
-
70
-
71
-
72
-
73
-
74
-
75
-
76
-
77
-
78
-
79
-
80
-
81
-
82
-
83
-
84
-
85
-
86
-
87
-
88
-
89
-
90
-
91
-
92
-
93
-
94
-
95
-
96
-
97
-
98
-
99
-
100
-
101
-
102
-
103
-
104
-
105
-
106
-
107
-
108
-
109
-
110
-
111
-
112
-
113
-
114
-
115
-
116
-
117
-
118
-
119
-
120
-
121
-
122
-
123
-
124
-
125
-
126
-
127
-
128
-
129
-
130
-
131
-
132
 |
 |
