Creative 70EM896106000 Owners Manual - Page 40
The Insert Menu, To Add a Send Insert
 |
UPC - 054651126893
View all Creative 70EM896106000 manuals
Add to My Manuals
Save this manual to your list of manuals |
Page 40 highlights
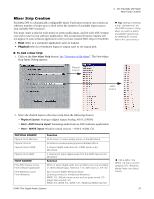
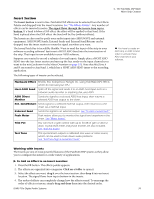
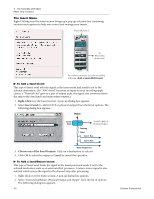
4 - The PatchMix DSP Mixer Mixer Strip Creation The Insert Menu Right-Clicking over the insert section brings up a pop-up selection box containing various insert options to help you control and manage your inserts. From MIc/Line A To Recording Application To connect an input to your recording software: Add a Host ASIO Insert. To Add a Send Insert: This type of insert send splits the signal at the insert point and sends it out to the selected destination. (An "ASIO Send" becomes an input on your recording application, a "Physical Out" goes to a pair of output jacks. the signal also continues down the strip to the Aux Sends and main mixer outputs.) 1. Right-Click over the Insert section. A pop-up dialog box appears. 2. Select Insert Send (to ASIO/WAVE or physical output) from the list of options. The following dialog box appears. Input Insert Send To ASIO, WAV or Physical Output Panning Fader Aux 1 Bus Aux 2 Bus Main Output Bus 3. Choose one of the Send Outputs. Click on a destination to select it. 4. Click OK to select the output or Cancel to cancel the operation. To Add a Send/Return Insert: This type of insert send breaks the signal at the insert point and sends it out to the selected destination such as an external effect processor. A return source signal is also selected which returns the signal to the channel strip after processing. 1. Right-Click over the Insert section. A pop-up dialog box appears. 2. Select "Insert Send/Return (Physical Output and Input)" from the list of options. The following dialog box appears. 40 Creative Professional
-
 1
1 -
2
-
3
-
4
-
5
-
6
-
7
-
8
-
9
-
10
-
11
-
12
-
13
-
14
-
15
-
16
-
17
-
18
-
19
-
20
-
21
-
22
-
23
-
24
-
25
-
26
-
27
-
28
-
29
-
30
-
31
-
32
-
33
-
34
-
 35
35 -
 36
36 -
 37
37 -
 38
38 -
 39
39 -
 40
40 -
 41
41 -
 42
42 -
 43
43 -
 44
44 -
 45
45 -
46
-
47
-
48
-
49
-
50
-
51
-
52
-
53
-
54
-
55
-
56
-
57
-
58
-
59
-
60
-
61
-
62
-
63
-
64
-
65
-
66
-
67
-
68
-
69
-
70
-
71
-
72
-
73
-
74
-
75
-
76
-
77
-
78
-
79
-
80
-
81
-
82
-
83
-
84
-
85
-
86
-
87
-
88
-
89
-
90
-
91
-
92
-
93
-
94
-
95
-
96
-
97
-
98
-
99
-
100
-
101
-
102
-
103
-
104
-
105
-
106
-
107
-
108
-
109
-
110
-
111
-
112
-
113
-
114
-
115
-
116
-
117
-
118
-
119
-
120
-
121
-
122
-
123
-
124
-
125
-
126
-
127
-
128
-
129
-
130
-
131
-
132
 |
 |
