Creative 70EM896106000 Owners Manual - Page 15
Installing the E-MU 1010 PCIe Card, IMPORTANT: Unplug the power cord from the wall outlet - e mu pcie
 |
UPC - 054651126893
View all Creative 70EM896106000 manuals
Add to My Manuals
Save this manual to your list of manuals |
Page 15 highlights
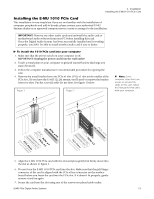
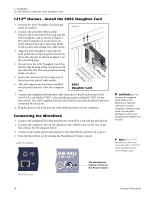
2 - Installation Installing the E-MU 1010 PCIe Card Installing the E-MU 1010 PCIe Card This installation is very simple but if you are not familiar with the installation of computer peripherals and add-in boards, please contact your authorized E-MU Systems dealer or an approved computer service center to arrange for the installation. IMPORTANT: Remove any other audio cards and uninstall the audio card or motherboard audio software from your PC before installing this card. Once the Digital Audio System has been successfully installed and is working properly, you MAY be able to install another audio card if you so desire. To install the 1010 PCIe card into your computer 1. Make sure that the power switch on your computer is off. IMPORTANT: Unplug the power cord from the wall outlet! 2. Touch a metal plate on your computer to ground yourself and to discharge any static electricity. 3. Follow the computer manufacturer's recommended procedure for opening the case. 4. Remove the metal bracket from one PCIe x1 slot. (PCIe x1 slots are the smallest of the PCie slots.) If you have the E-MU 1212M system, you'll need to remove the bracket from two slots. Put the screw(s) aside for use later. See figure 1 below. Figure 1 Figure 2 Note: Some computer cases don't use screws to secure PCIe cards. In this case, follow the instructions that came with your computer. x16 PCIe x1 PCIe (mPoanyCnyIooSut rbleocoptmrsepsuetnetr) PCIe x16 PCPICeIe x1 x1 (mPoanyCnyIooSut rbleocoptmrsepsuetnetr) 5. Align the E-MU 1010 PCIe card with the slot and press gently but firmly down into the slot as shown in figure 2. 6. Do not force the E-MU 1010 PCIe card into the slot. Make sure that the gold finger connector of the card is aligned with the PCIe x1bus connector on the motherboard before you insert the card into the PCIe slot. If it doesn't fit properly, gently remove it and try again. 7. Secure the card into the slot using one of the screws you placed aside earlier. E-MU PCIe Digital Audio Systems 15
-
 1
1 -
2
-
3
-
4
-
5
-
6
-
7
-
8
-
9
-
 10
10 -
 11
11 -
 12
12 -
 13
13 -
 14
14 -
 15
15 -
 16
16 -
 17
17 -
 18
18 -
 19
19 -
 20
20 -
21
-
22
-
23
-
24
-
25
-
26
-
27
-
28
-
29
-
30
-
31
-
32
-
33
-
34
-
35
-
36
-
37
-
38
-
39
-
40
-
41
-
42
-
43
-
44
-
45
-
46
-
47
-
48
-
49
-
50
-
51
-
52
-
53
-
54
-
55
-
56
-
57
-
58
-
59
-
60
-
61
-
62
-
63
-
64
-
65
-
66
-
67
-
68
-
69
-
70
-
71
-
72
-
73
-
74
-
75
-
76
-
77
-
78
-
79
-
80
-
81
-
82
-
83
-
84
-
85
-
86
-
87
-
88
-
89
-
90
-
91
-
92
-
93
-
94
-
95
-
96
-
97
-
98
-
99
-
100
-
101
-
102
-
103
-
104
-
105
-
106
-
107
-
108
-
109
-
110
-
111
-
112
-
113
-
114
-
115
-
116
-
117
-
118
-
119
-
120
-
121
-
122
-
123
-
124
-
125
-
126
-
127
-
128
-
129
-
130
-
131
-
132
 |
 |
