Creative 70EM896106000 Owners Manual - Page 59
FX Edit Screen, To Bypass an Insert, To Solo an Insert
 |
UPC - 054651126893
View all Creative 70EM896106000 manuals
Add to My Manuals
Save this manual to your list of manuals |
Page 59 highlights
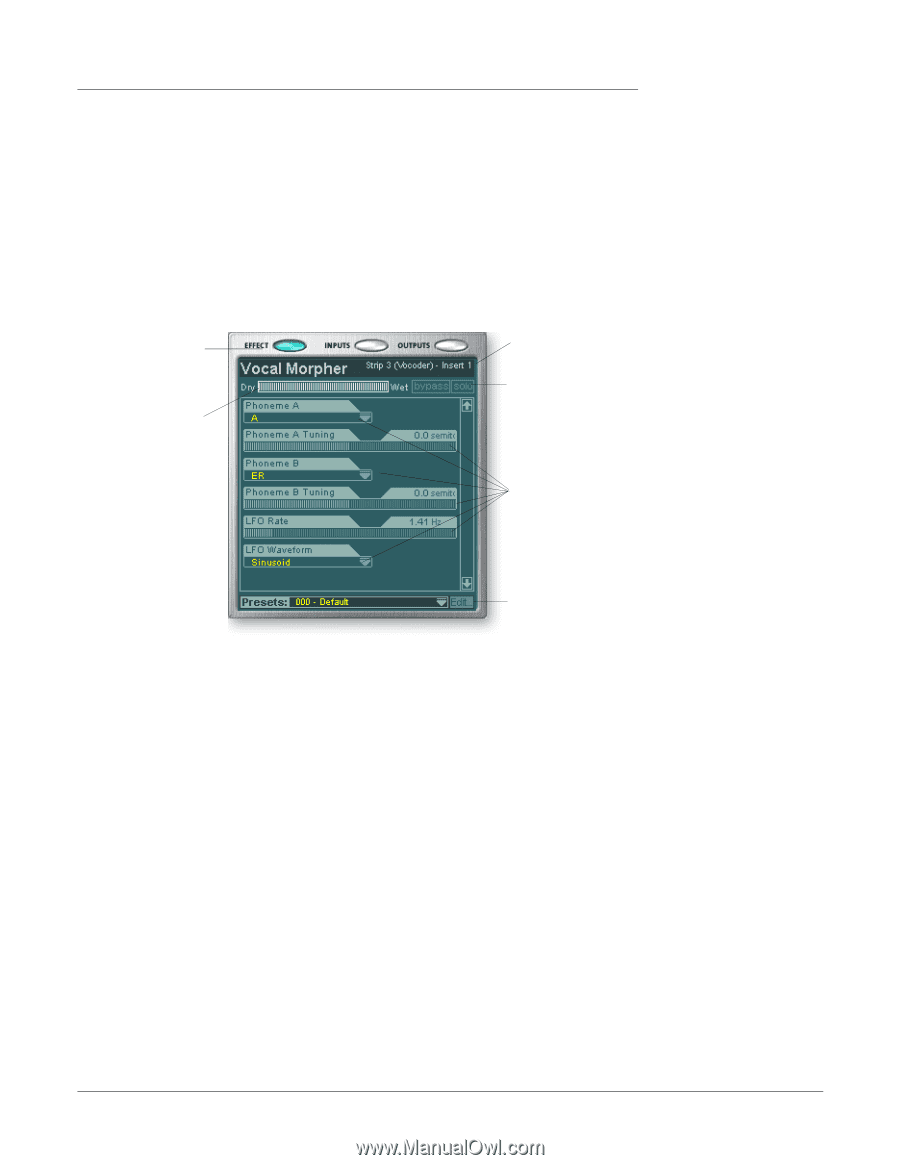
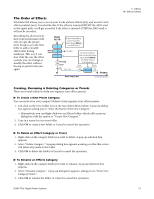
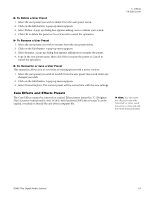
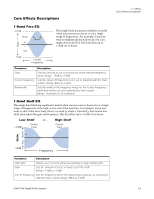
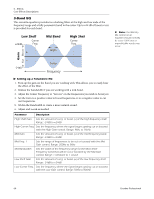
FX Edit Screen Click on an FX Insert to display the parameters for that effect. If an insert effect is not selected, the FX display will read "No Insert." Most effects have a wet/dry mix parameter to control the ratio of effect-to-plain signal. The wet/dry setting is stored with the FX preset. The effect parameters vary with the type of effect. Generally if an effect is placed in an Aux Send, the wet/dry mix in the effect should be set to 100% wet since the Aux Return amount controls how much effect is applied. The User Preset section is located at the bottom of the FX Edit screen. User presets are variations of the main effect and can be edited, deleted, renamed or overwritten as you wish. Effects Display View Button Wet/Dry Mix Control Effect Location Effect Bypass & Solo Buttons 5 - Effects FX Edit Screen Note: Effects have to be placed into an insert location before you can program them. Effect Parameters User Preset Section To Bypass an Insert: Inserts can be bypassed if you want to temporarily hear the audio without the effect or insert. Bypass can also be used to turn off a Send Insert. Method #1 1. Click on the Effect (in the Insert section) 2. Click the Bypass button in the TV display. Method #2 1. Right-click over the Insert you want to bypass (in the Insert section). A pop-up menu appears. 2. Select "Bypass Insert" from the list of options. The insert effect name will "grayout" to indicate that the insert effect is bypassed. To Solo an Insert: Inserts can also be soloed. Solo bypasses all the other inserts in the strip and allows you to hear only the soloed effect. This feature is very useful when adjusting the effect parameters. Method #1 1. Click on the Insert Effect (in the Insert section). 2. Click the Solo button in the TV display. E-MU PCIe Digital Audio Systems 59
-
 1
1 -
2
-
3
-
4
-
5
-
6
-
7
-
8
-
9
-
10
-
11
-
12
-
13
-
14
-
15
-
16
-
17
-
18
-
19
-
20
-
21
-
22
-
23
-
24
-
25
-
26
-
27
-
28
-
29
-
30
-
31
-
32
-
33
-
34
-
35
-
36
-
37
-
38
-
39
-
40
-
41
-
42
-
43
-
44
-
45
-
46
-
47
-
48
-
49
-
50
-
51
-
52
-
53
-
 54
54 -
 55
55 -
 56
56 -
 57
57 -
 58
58 -
 59
59 -
 60
60 -
 61
61 -
 62
62 -
 63
63 -
 64
64 -
65
-
66
-
67
-
68
-
69
-
70
-
71
-
72
-
73
-
74
-
75
-
76
-
77
-
78
-
79
-
80
-
81
-
82
-
83
-
84
-
85
-
86
-
87
-
88
-
89
-
90
-
91
-
92
-
93
-
94
-
95
-
96
-
97
-
98
-
99
-
100
-
101
-
102
-
103
-
104
-
105
-
106
-
107
-
108
-
109
-
110
-
111
-
112
-
113
-
114
-
115
-
116
-
117
-
118
-
119
-
120
-
121
-
122
-
123
-
124
-
125
-
126
-
127
-
128
-
129
-
130
-
131
-
132
 |
 |