Creative 70EM896106000 Owners Manual - Page 108
E-Delay Compensator, Setup PatchMix DSP, Setup Cubase
 |
UPC - 054651126893
View all Creative 70EM896106000 manuals
Add to My Manuals
Save this manual to your list of manuals |
Page 108 highlights
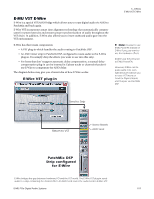
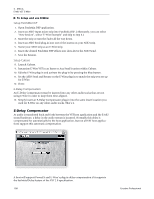
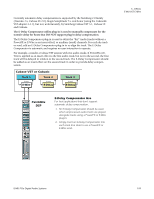
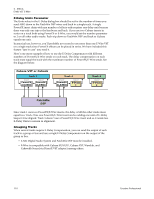
5 - Effects E-MU VST E-Wire To Setup and use E-Wire: Setup PatchMix DSP 1. Open PatchMix DSP application. 2. Insert an ASIO Input mixer strip into PatchMix DSP. (Alternately, you can select "New Session", select "E-Wire Example" and skip to step 6.) 3. Mute the strip or turn the Fader all the way down. 4. Insert an ASIO Send plug-in into one of the inserts on your ASIO strip. 5. Name your ASIO strip as an E-Wire strip. 6. Insert the desired PatchMix DSP effects into slots above the ASIO Send. 7. Save the Session. Setup Cubase 8. Launch Cubase. 9. Instantiate E-Wire VST in an Insert or Aux Send location within Cubase. 10. Edit the E-Wire plug-in and activate the plug-in by pressing the blue button. 11. Set the ASIO Send and Return on the E-Wire plug-in to match the strip you set up for E-Wire. 12. Done. E-Delay Compensation An E-Delay Compensator must be inserted into any other audio tracks that are not using E-Wire in order to keep them time-aligned. 13. Simply insert an E-Delay Compensator plug-in into the same insert location you used for E-Wire on any other audio tracks. That's it. E-Delay Compensator As audio is transferred back and forth between the VST host application and the E-MU sound hardware, a delay in the audio stream is incurred. Normally this delay is compensated for automatically by the host application, but not all VST host applications support this automatic compensation. A host will support PowerFX and E-Wire's plug-in delay compensation if it supports the SetInitialDelay feature of the VST 2.0 specification. 108 Creative Professional
-
 1
1 -
2
-
3
-
4
-
5
-
6
-
7
-
8
-
9
-
10
-
11
-
12
-
13
-
14
-
15
-
16
-
17
-
18
-
19
-
20
-
21
-
22
-
23
-
24
-
25
-
26
-
27
-
28
-
29
-
30
-
31
-
32
-
33
-
34
-
35
-
36
-
37
-
38
-
39
-
40
-
41
-
42
-
43
-
44
-
45
-
46
-
47
-
48
-
49
-
50
-
51
-
52
-
53
-
54
-
55
-
56
-
57
-
58
-
59
-
60
-
61
-
62
-
63
-
64
-
65
-
66
-
67
-
68
-
69
-
70
-
71
-
72
-
73
-
74
-
75
-
76
-
77
-
78
-
79
-
80
-
81
-
82
-
83
-
84
-
85
-
86
-
87
-
88
-
89
-
90
-
91
-
92
-
93
-
94
-
95
-
96
-
97
-
98
-
99
-
100
-
101
-
102
-
 103
103 -
 104
104 -
 105
105 -
 106
106 -
 107
107 -
 108
108 -
 109
109 -
 110
110 -
 111
111 -
 112
112 -
 113
113 -
114
-
115
-
116
-
117
-
118
-
119
-
120
-
121
-
122
-
123
-
124
-
125
-
126
-
127
-
128
-
129
-
130
-
131
-
132
 |
 |
