HTC Ozone Download the HTC Ozone ROM Update - Version 2.16.605.15 - Page 23
Charging the Battery, 4 Starting Up, 5 Changing Networks with Your Global Phone - manual
 |
View all HTC Ozone manuals
Add to My Manuals
Save this manual to your list of manuals |
Page 23 highlights
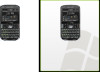
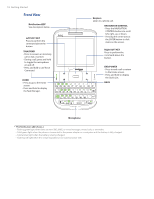
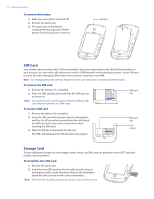
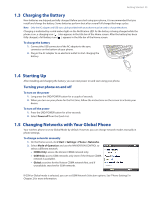
Getting Started 23 1.3 Charging the Battery New batteries are shipped partially charged. Before you start using your phone, it is recommended that you install and charge the battery. Some batteries perform best after several full charge/discharge cycles. Note Only the AC adapter and USB sync cable provided with your phone must be used to charge the phone. Charging is indicated by a solid amber light on the Notification LED. As the battery is being charged while the phone is on, a charging icon ( ) also appears in the title bar of the Home screen. After the battery has been fully charged, a full battery icon ( ) appears in the title bar of the Home screen. To charge the battery 1. Connect the USB connector of the AC adapter to the sync connector on the bottom of your phone. 2. Plug in the AC adapter to an electrical outlet to start charging the battery. 1.4 Starting Up After installing and charging the battery, you can now power on and start using your phone. Turning your phone on and off To turn on the power 1. Long press the END/POWER button for a couple of seconds. 2. When you turn on your phone for the first time, follow the instructions on the screen to activate your device. To turn off the power 1. Press the END/POWER button for a few seconds. 2. Select Power off from the Quick List. 1.5 Changing Networks with Your Global Phone Your wireless phone is set to Global Mode by default. However, you can change network modes manually in phone settings. To change networks manually 1. On the Home screen, click Start > Settings > Phone > Networks. 2. Select Mode of Operation and use the NAVIGATION CONTROL to select a different network. • CDMA Only: access the Verizon CDMA network only. • GSM Only: access GSM networks only (even if the Verizon CDMA network is available). • Global: searches for the Verizon CDMA network first, and if unavailable, searches for GSM networks. If GSM or Global mode is selected, you can set GSM Network Selection options. See "Phone Settings" in Chapter 2 for more information.
-
 1
1 -
2
-
3
-
4
-
5
-
6
-
7
-
8
-
9
-
10
-
11
-
12
-
13
-
14
-
15
-
16
-
17
-
 18
18 -
 19
19 -
 20
20 -
 21
21 -
 22
22 -
 23
23 -
 24
24 -
 25
25 -
 26
26 -
 27
27 -
 28
28 -
29
-
30
-
31
-
32
-
33
-
34
-
35
-
36
-
37
-
38
-
39
-
40
-
41
-
42
-
43
-
44
-
45
-
46
-
47
-
48
-
49
-
50
-
51
-
52
-
53
-
54
-
55
-
56
-
57
-
58
-
59
-
60
-
61
-
62
-
63
-
64
-
65
-
66
-
67
-
68
-
69
-
70
-
71
-
72
-
73
-
74
-
75
-
76
-
77
-
78
-
79
-
80
-
81
-
82
-
83
-
84
-
85
-
86
-
87
-
88
-
89
-
90
-
91
-
92
-
93
-
94
-
95
-
96
-
97
-
98
-
99
-
100
-
101
-
102
 |
 |