HTC Ozone Download the HTC Ozone ROM Update - Version 2.16.605.15 - Page 45
HTC Ozone Manual
 |
View all HTC Ozone manuals
Add to My Manuals
Save this manual to your list of manuals |
Page 45 highlights
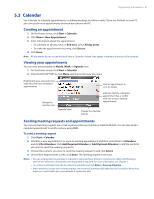
Chapter 5 Organizing Information 5.1 Contacts Contacts is your address book and information storage for the people and businesses you communicate with. If you use Outlook on your PC, you can synchronize contacts between your phone and PC. Creating a contact 1. On the Home panel, click Contacts > New > Outlook Contact. Note To create a new contact on your SIM card (if one is installed), select SIM Contact. You can also use SIM Manager to add contacts to your SIM card. For more information about SIM Manager, see "SIM Manager" in this chapter. 2. Enter the contact details in the fields provided. 3. To easily identify the caller, you can assign a custom ring tone to each Outlook contact. To assign a custom ring tone, scroll down to Custom ring tone, and select the desired ring tone. 4. To assign a picture to a contact, scroll down to Picture, click Select a picture and choose the picture you want. 5. Click Done. Tips • If someone who is not in your list of contacts calls, you can quickly create a contact from Call History by clicking Menu > Save to Contacts. • If someone who is not in your list of contacts sends you a message, select the message in the message thread and and press ENTER. You are prompted to create a new contact for the person. Editing and calling a contact To view and edit a contact information 1. On the Home panel, click Contacts. 2. Select the contact whose information you want to view or edit and click Menu > Edit. 3. When finished making changes, click Done. To call a contact from the contact list 1. On the Home panel, click Contacts. 2. Select the contact to call and press TALK/SEND. The contact's default phone number is dialed. Tip To call a phone number other than the default, click the contact, scroll to the number you want to dial, and press TALK/SEND. Finding a contact To find a contact 1. On the Home panel, click Contacts. 2. Do one of the following: • Begin entering a name or phone number of the contact until the contact is displayed. When you press a key, such as S, you find first and last names that begin with S. The next key you press continues to narrow the search. • If you have assigned categories (e.g. Business) to your Outlook contacts, you can filter the contact list by categories. In the contact list, click Menu > Filter and then click a category. To show all contacts again, select All Contacts. • If you have entered information under Company for your Outlook contacts on your phone, you can quickly locate the contacts that work for a specific company. In the contact list, click Menu > View By > Company. Click the company to see the contacts who work there. Note If you are not in Name view, click Menu > View By > Name.
-
 1
1 -
2
-
3
-
4
-
5
-
6
-
7
-
8
-
9
-
10
-
11
-
12
-
13
-
14
-
15
-
16
-
17
-
18
-
19
-
20
-
21
-
22
-
23
-
24
-
25
-
26
-
27
-
28
-
29
-
30
-
31
-
32
-
33
-
34
-
35
-
36
-
37
-
38
-
39
-
 40
40 -
 41
41 -
 42
42 -
 43
43 -
 44
44 -
 45
45 -
 46
46 -
 47
47 -
 48
48 -
 49
49 -
 50
50 -
51
-
52
-
53
-
54
-
55
-
56
-
57
-
58
-
59
-
60
-
61
-
62
-
63
-
64
-
65
-
66
-
67
-
68
-
69
-
70
-
71
-
72
-
73
-
74
-
75
-
76
-
77
-
78
-
79
-
80
-
81
-
82
-
83
-
84
-
85
-
86
-
87
-
88
-
89
-
90
-
91
-
92
-
93
-
94
-
95
-
96
-
97
-
98
-
99
-
100
-
101
-
102
 |
 |