HP 4400C HP Scanjet 4400C/5400C Series Scanner Mac - (English) User Manual - Page 106
Control Panels, Apple, HP Scanjet Controls, Buttons, ADF Size, Setup, Application, Finder - scanjet os x
 |
UPC - 725184800566
View all HP 4400C manuals
Add to My Manuals
Save this manual to your list of manuals |
Page 106 highlights
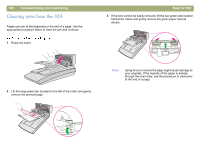
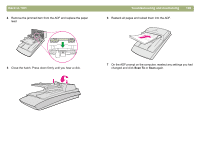
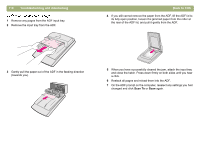
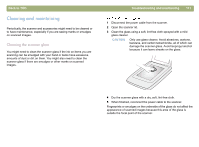
106 Troubleshooting and maintaining The bottom of the scanned image is cut off. l The ADF can handle items up to 355.6 mm (14 inches) long. If the item is longer, scan it in sections on the glass. If the item is the correct length, choose the correct page size setting in the ADF dialog box prompt before scanning. l If sent to a printer, the item might be too complex (require too much memory) for the printer to process. If possible, choose a printer with more memory. Or, select a lower resolution or different output type, like black and white or grayscale. l If you are scanning from the scanner buttons, make sure the correct page size for the ADF is selected in the HP Scanjet Controls control panel: 1 Choose Control Panels from the Apple ( ) menu, and then choose HP Scanjet Controls from the submenu. 2 Click the Buttons tab in the HP Scanjet Controls dialog box, and then click the tab for the scanner button you are using. 3 In the ADF Page Size section of the dialog box, select the setting that corresponds to the pages you are using with the ADF. 4 Close the HP Scanjet Controls dialog box. Note: If you use a different scanner button with the ADF and encounter this problem again, follow these steps to set the correct page size for that button. Back to TOC After starting a scan from the Copy button using the ADF, the scanned image is reduced on the printed page and extra space appears around the scanned image. When using the Copy button, the ADF page size settings are not sent automatically to the printer. Set the page size in the Page Setup dialog box on the computer: 1 In the Application menu (located in the upper-right corner of the screen), choose Finder. 2 In the File menu, choose Page Setup. 3 Choose the appropriate page size in the Paper pull-down menu. 4 Click OK. For more information about setting the page size, see the Mac OS Help on your computer.
-
 1
1 -
2
-
3
-
4
-
5
-
6
-
7
-
8
-
9
-
10
-
11
-
12
-
13
-
14
-
15
-
16
-
17
-
18
-
19
-
20
-
21
-
22
-
23
-
24
-
25
-
26
-
27
-
28
-
29
-
30
-
31
-
32
-
33
-
34
-
35
-
36
-
37
-
38
-
39
-
40
-
41
-
42
-
43
-
44
-
45
-
46
-
47
-
48
-
49
-
50
-
51
-
52
-
53
-
54
-
55
-
56
-
57
-
58
-
59
-
60
-
61
-
62
-
63
-
64
-
65
-
66
-
67
-
68
-
69
-
70
-
71
-
72
-
73
-
74
-
75
-
76
-
77
-
78
-
79
-
80
-
81
-
82
-
83
-
84
-
85
-
86
-
87
-
88
-
89
-
90
-
91
-
92
-
93
-
94
-
95
-
96
-
97
-
98
-
99
-
100
-
 101
101 -
 102
102 -
 103
103 -
 104
104 -
 105
105 -
 106
106 -
 107
107 -
 108
108 -
 109
109 -
 110
110 -
 111
111 -
112
-
113
-
114
-
115
-
116
-
117
-
118
-
119
-
120
-
121
-
122
-
123
-
124
-
125
-
126
-
127
-
128
-
129
-
130
-
131
-
132
-
133
-
134
-
135
-
136
-
137
-
138
-
139
-
140
-
141
-
142
-
143
-
144
-
145
-
146
 |
 |