HP 4400C HP Scanjet 4400C/5400C Series Scanner Mac - (English) User Manual - Page 56
Changing the hue, Changing the saturation, Advanced, Adjust Color, Saturation
 |
UPC - 725184800566
View all HP 4400C manuals
Add to My Manuals
Save this manual to your list of manuals |
Page 56 highlights
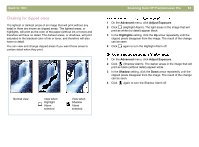
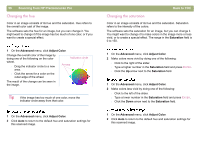
56 Scanning from HP Precisionscan Pro Changing the hue Color in an image consists of its hue and the saturation. Hue refers to the overall color cast of the image. The software sets the hue for an image, but you can change it. You might want to change it if the image has too much of one color, or if you want to create a special effect. 1 On the Advanced menu, click Adjust Color. Change the overall color of the image by doing one of the following on the color wheel. l Drag the indicator circle to a new area. Indicator circle Arrows l Click the arrow for a color on the outer edge of the wheel. The result of the change can be seen in the image. Tip If the image has too much of one color, move the indicator circle away from that color. 1 On the Advanced menu, click Adjust Color. 2 Click Auto to return to the default hue and saturation settings for this scanned image. Back to TOC Changing the saturation Color in an image consists of its hue and the saturation. Saturation refers to the intensity of the colors. The software sets the saturation for an image, but you can change it. You might want to change it to make colors in the image more or less vivid, or to create a special effect. The range in the Saturation field is 0 to 150. 1 On the Advanced menu, click Adjust Color. 2 Make colors more vivid by doing one of the following: l Click to the right of the slider. l Type a higher number in the Saturation field and press ENTER. l Click the Up arrow next to the Saturation field. 1 On the Advanced menu, click Adjust Color. 2 Make colors less vivid by doing one of the following: l Click to the left of the slider. l Type a lower number in the Saturation field and press ENTER. l Click the Down arrow next to the Saturation field. 1 On the Advanced menu, click Adjust Color. 2 Click Auto to return to the default hue and saturation settings for this scanned image.
-
 1
1 -
2
-
3
-
4
-
5
-
6
-
7
-
8
-
9
-
10
-
11
-
12
-
13
-
14
-
15
-
16
-
17
-
18
-
19
-
20
-
21
-
22
-
23
-
24
-
25
-
26
-
27
-
28
-
29
-
30
-
31
-
32
-
33
-
34
-
35
-
36
-
37
-
38
-
39
-
40
-
41
-
42
-
43
-
44
-
45
-
46
-
47
-
48
-
49
-
50
-
 51
51 -
 52
52 -
 53
53 -
 54
54 -
 55
55 -
 56
56 -
 57
57 -
 58
58 -
 59
59 -
 60
60 -
 61
61 -
62
-
63
-
64
-
65
-
66
-
67
-
68
-
69
-
70
-
71
-
72
-
73
-
74
-
75
-
76
-
77
-
78
-
79
-
80
-
81
-
82
-
83
-
84
-
85
-
86
-
87
-
88
-
89
-
90
-
91
-
92
-
93
-
94
-
95
-
96
-
97
-
98
-
99
-
100
-
101
-
102
-
103
-
104
-
105
-
106
-
107
-
108
-
109
-
110
-
111
-
112
-
113
-
114
-
115
-
116
-
117
-
118
-
119
-
120
-
121
-
122
-
123
-
124
-
125
-
126
-
127
-
128
-
129
-
130
-
131
-
132
-
133
-
134
-
135
-
136
-
137
-
138
-
139
-
140
-
141
-
142
-
143
-
144
-
145
-
146
 |
 |