HP 4400C HP Scanjet 4400C/5400C Series Scanner Mac - (English) User Manual - Page 58
Setting which colors become black or white in black & white bitmaps, Black & White Bitmap, Output
 |
UPC - 725184800566
View all HP 4400C manuals
Add to My Manuals
Save this manual to your list of manuals |
Page 58 highlights
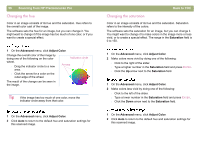
58 Scanning from HP Precisionscan Pro Setting which colors become black or white in black & white bitmaps This procedure only applies to color images that will be using the Black & White Bitmap output type. It allows you to create special effects, or to correct for originals on colored paper. Images consist of pixels. In color images, each pixel has a varying amount of Red, Green, or Blue to create its specific color. You can determine whether the Red, Green, or Blue in each pixel turns to black or white in the final scanned image. Back to TOC 1 Make sure that Black & White Bitmap is selected on the Output Type menu. The selection should have a dot beside it. 2 On the Advanced menu, click Adjust Black & White. 3 Select a color channel from the Scan using channel list. l Choose Red to change the red in the image to white. Green and blue become black. Useful for originals printed on pink or red paper. l Choose Green to change the green in the image to white. Red and blue become black. Useful for originals printed on green paper. l Choose Blue to change the blue in the image to white. Red and green become black.Useful for originals printed on blue paper. l Choose NTSC Gray to convert light shades of all colors to white and dark shades of all colors to black. (No one color becomes all white or all black.) Colors are converted to gray at a ratio of 30% red, 59% green, and 11% blue. 1 Make sure that Black & White Bitmap is selected on the Output Type menu. The selection should have a checkmark beside it. 2 On the Advanced menu, click Adjust Black & White. 3 Choose NTSC Gray from the Scan using channel list. 4 Click Auto.
-
 1
1 -
2
-
3
-
4
-
5
-
6
-
7
-
8
-
9
-
10
-
11
-
12
-
13
-
14
-
15
-
16
-
17
-
18
-
19
-
20
-
21
-
22
-
23
-
24
-
25
-
26
-
27
-
28
-
29
-
30
-
31
-
32
-
33
-
34
-
35
-
36
-
37
-
38
-
39
-
40
-
41
-
42
-
43
-
44
-
45
-
46
-
47
-
48
-
49
-
50
-
51
-
52
-
 53
53 -
 54
54 -
 55
55 -
 56
56 -
 57
57 -
 58
58 -
 59
59 -
 60
60 -
 61
61 -
 62
62 -
 63
63 -
64
-
65
-
66
-
67
-
68
-
69
-
70
-
71
-
72
-
73
-
74
-
75
-
76
-
77
-
78
-
79
-
80
-
81
-
82
-
83
-
84
-
85
-
86
-
87
-
88
-
89
-
90
-
91
-
92
-
93
-
94
-
95
-
96
-
97
-
98
-
99
-
100
-
101
-
102
-
103
-
104
-
105
-
106
-
107
-
108
-
109
-
110
-
111
-
112
-
113
-
114
-
115
-
116
-
117
-
118
-
119
-
120
-
121
-
122
-
123
-
124
-
125
-
126
-
127
-
128
-
129
-
130
-
131
-
132
-
133
-
134
-
135
-
136
-
137
-
138
-
139
-
140
-
141
-
142
-
143
-
144
-
145
-
146
 |
 |