HP LaserJet Enterprise MFP M630 LaserJet Analog Fax Accessory 500 - Fax Guide - Page 105
Set ring frequency, Advanced image processing settings, Adjust sharpness, Fax Receive Settings
 |
View all HP LaserJet Enterprise MFP M630 manuals
Add to My Manuals
Save this manual to your list of manuals |
Page 105 highlights
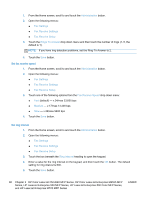
Set ring frequency NOTE: The default ring frequency covers a broad frequency range, and should rarely require adjustment. 1. From the Home screen, scroll to and touch the Administration button. 2. Open the following menus: ● Fax Settings ● Fax Receive Settings ● Fax Receive Setup 3. Touch the box beneath the Ring Frequency heading to open the keypad. 4. Enter a value for the ring frequency on the keypad, and then touch the OK button. The default setting for ring frequency is 68 hz. 5. Touch the Save button. Advanced image processing settings Use the advanced image settings to enhance scanned images in several ways. The following settings can be adjusted: ● Adjust sharpness ● Erase edges ● Automatic color detection ● Automatic page cropping ● Automatic image orientation ● Automatic tone adjustment Adjust sharpness Adjust the Sharpness setting to clarify or soften the image. For example, increasing the sharpness can make text appear crisper, but decreasing it can make photos appear smoother. 1. From the Home screen, touch the Fax button. 2. Complete the fields on the first screen to specify the fax recipient information. 3. Touch the More Options button at the bottom of the screen. 4. Touch the Image Adjustment button. NOTE: If the Image Adjustment button is not on the first page of options, touch the More Options button again to scroll to the next page. 5. Adjust the Sharpness slider to the left to decrease the sharpness, or adjust it to the right to increase the sharpness. ENWW Fax settings 93
-
 1
1 -
2
-
3
-
4
-
5
-
6
-
7
-
8
-
9
-
10
-
11
-
12
-
13
-
14
-
15
-
16
-
17
-
18
-
19
-
20
-
21
-
22
-
23
-
24
-
25
-
26
-
27
-
28
-
29
-
30
-
31
-
32
-
33
-
34
-
35
-
36
-
37
-
38
-
39
-
40
-
41
-
42
-
43
-
44
-
45
-
46
-
47
-
48
-
49
-
50
-
51
-
52
-
53
-
54
-
55
-
56
-
57
-
58
-
59
-
60
-
61
-
62
-
63
-
64
-
65
-
66
-
67
-
68
-
69
-
70
-
71
-
72
-
73
-
74
-
75
-
76
-
77
-
78
-
79
-
80
-
81
-
82
-
83
-
84
-
85
-
86
-
87
-
88
-
89
-
90
-
91
-
92
-
93
-
94
-
95
-
96
-
97
-
98
-
99
-
 100
100 -
 101
101 -
 102
102 -
 103
103 -
 104
104 -
 105
105 -
 106
106 -
 107
107 -
 108
108 -
 109
109 -
 110
110 -
111
-
112
-
113
-
114
-
115
-
116
-
117
-
118
-
119
-
120
-
121
-
122
-
123
-
124
-
125
-
126
-
127
-
128
-
129
-
130
-
131
-
132
-
133
-
134
-
135
-
136
-
137
-
138
-
139
-
140
-
141
-
142
-
143
-
144
-
145
-
146
-
147
-
148
-
149
-
150
-
151
-
152
-
153
-
154
-
155
-
156
-
157
-
158
-
159
-
160
-
161
-
162
-
163
-
164
-
165
-
166
-
167
-
168
 |
 |
