HP LaserJet Enterprise MFP M630 LaserJet Analog Fax Accessory 500 - Fax Guide - Page 106
Erase edges, Automatic color detection
 |
View all HP LaserJet Enterprise MFP M630 manuals
Add to My Manuals
Save this manual to your list of manuals |
Page 106 highlights
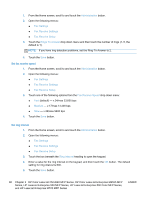
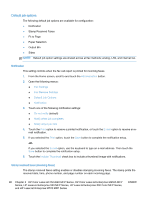
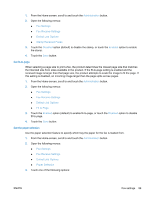
6. Touch the OK button to save the changes. 7. Touch the Start button to begin scanning. Erase edges Use the Erase Edges feature to remove blemishes, such as dark borders or staple marks, by cleaning the edges of the scanned image. 1. From the Home screen, touch the Fax button. 2. Complete the fields on the first screen to specify the fax recipient information. 3. Touch the More Options button at the bottom of the screen. 4. Touch the Erase Edges button. NOTE: If the Erase Edges button is not on the first page of options, touch the More Options button again to scroll to the next page. 5. If necessary, change the unit of measure by selecting the Use inches box or the Use millimeters box. 6. Touch the field for an edge of the image that you want to clean, and then enter the distance from the edge of the page to clean. Repeat this step for each edge that you want to clean. 7. Touch the OK button to save the changes. 8. Touch the Start button to begin scanning. Automatic color detection Use the Color/Black feature to configure the color settings that the product uses for scanned images. The following options are available: Auto detect Color Black/Gray Black The product previews the images and determines whether the pages contain color. If the pages have color, the product creates a color image. If the pages do not have color, the product creates a black image or a grayscale image. Black and grayscale images have a smaller file size than color images. The product always creates a color image. The product always creates an image in black and grayscale. The product always creates an image in black only, with no shades of gray. 1. From the Home screen, touch the Fax button. 2. Complete the fields on the first screen to specify the fax recipient information. 3. Touch the More Options button at the bottom of the screen. 4. Touch the Color/Black button. NOTE: If the Color/Black button is not on the first page of options, touch the More Options button again to scroll to the next page. 94 Chapter 3 HP Color LaserJet CM 4540 MFP Series, HP Color LaserJet Enterprise M4555 MFP Series, HP LaserJet Enterprise 500 MFP Series, HP LaserJet Enterprise 500 Color MFP Series, and HP LaserJet Enterprise M725 MFP Series ENWW
-
 1
1 -
2
-
3
-
4
-
5
-
6
-
7
-
8
-
9
-
10
-
11
-
12
-
13
-
14
-
15
-
16
-
17
-
18
-
19
-
20
-
21
-
22
-
23
-
24
-
25
-
26
-
27
-
28
-
29
-
30
-
31
-
32
-
33
-
34
-
35
-
36
-
37
-
38
-
39
-
40
-
41
-
42
-
43
-
44
-
45
-
46
-
47
-
48
-
49
-
50
-
51
-
52
-
53
-
54
-
55
-
56
-
57
-
58
-
59
-
60
-
61
-
62
-
63
-
64
-
65
-
66
-
67
-
68
-
69
-
70
-
71
-
72
-
73
-
74
-
75
-
76
-
77
-
78
-
79
-
80
-
81
-
82
-
83
-
84
-
85
-
86
-
87
-
88
-
89
-
90
-
91
-
92
-
93
-
94
-
95
-
96
-
97
-
98
-
99
-
100
-
 101
101 -
 102
102 -
 103
103 -
 104
104 -
 105
105 -
 106
106 -
 107
107 -
 108
108 -
 109
109 -
 110
110 -
 111
111 -
112
-
113
-
114
-
115
-
116
-
117
-
118
-
119
-
120
-
121
-
122
-
123
-
124
-
125
-
126
-
127
-
128
-
129
-
130
-
131
-
132
-
133
-
134
-
135
-
136
-
137
-
138
-
139
-
140
-
141
-
142
-
143
-
144
-
145
-
146
-
147
-
148
-
149
-
150
-
151
-
152
-
153
-
154
-
155
-
156
-
157
-
158
-
159
-
160
-
161
-
162
-
163
-
164
-
165
-
166
-
167
-
168
 |
 |
