HP LaserJet Enterprise MFP M630 LaserJet Analog Fax Accessory 500 - Fax Guide - Page 99
Notification, Content orientation, Include Thumbnail
 |
View all HP LaserJet Enterprise MFP M630 manuals
Add to My Manuals
Save this manual to your list of manuals |
Page 99 highlights
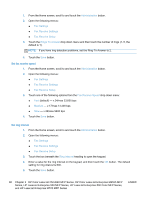
4. Touch the Orientation button to set the page orientation. 5. Touch the Save button. Notification Notification selects when and how you are notified of the status of an outgoing fax. This setting applies to the current fax only. To change the setting permanently, change the default setting. 1. From the Home screen, touch the Administration icon. 2. Open the following menus: ● Fax Settings ● Fax Send Settings ● Default Job Options ● Notification 3. Touch one of the following notification settings: ● Do not notify (default) ● Notify when job completes ● Notify only if job fails 4. Touch the Print option to receive a printed notification, or touch the E-mail option to receive an email notification. 5. If you selected the Print option, touch the Save button to complete the notification setup. -orIf you selected the E-mail option, use the keyboard to type an e-mail address. Then touch the OK button to complete the notification setup. 6. Touch the Include Thumbnail check box to include a thumbnail image with notifications. Content orientation Use the content orientation feature to set how the fax content is oriented on the page. For 1-sided pages, choose Portrait (short-edge on top, default setting) or Landscape (long-edge on top). For 2- sided pages, choose Book-style (short-edge on top) or Flip-style (long-edge on top). 1. From the Home screen, scroll to and touch the Administration button. 2. Open the following menus: ● Fax Settings ● Fax Send Settings ● Default Job Options ● Content Orientation 3. Touch Portrait (default) or Landscape for 1-sided pages. ENWW Fax settings 87
-
 1
1 -
2
-
3
-
4
-
5
-
6
-
7
-
8
-
9
-
10
-
11
-
12
-
13
-
14
-
15
-
16
-
17
-
18
-
19
-
20
-
21
-
22
-
23
-
24
-
25
-
26
-
27
-
28
-
29
-
30
-
31
-
32
-
33
-
34
-
35
-
36
-
37
-
38
-
39
-
40
-
41
-
42
-
43
-
44
-
45
-
46
-
47
-
48
-
49
-
50
-
51
-
52
-
53
-
54
-
55
-
56
-
57
-
58
-
59
-
60
-
61
-
62
-
63
-
64
-
65
-
66
-
67
-
68
-
69
-
70
-
71
-
72
-
73
-
74
-
75
-
76
-
77
-
78
-
79
-
80
-
81
-
82
-
83
-
84
-
85
-
86
-
87
-
88
-
89
-
90
-
91
-
92
-
93
-
 94
94 -
 95
95 -
 96
96 -
 97
97 -
 98
98 -
 99
99 -
 100
100 -
 101
101 -
 102
102 -
 103
103 -
 104
104 -
105
-
106
-
107
-
108
-
109
-
110
-
111
-
112
-
113
-
114
-
115
-
116
-
117
-
118
-
119
-
120
-
121
-
122
-
123
-
124
-
125
-
126
-
127
-
128
-
129
-
130
-
131
-
132
-
133
-
134
-
135
-
136
-
137
-
138
-
139
-
140
-
141
-
142
-
143
-
144
-
145
-
146
-
147
-
148
-
149
-
150
-
151
-
152
-
153
-
154
-
155
-
156
-
157
-
158
-
159
-
160
-
161
-
162
-
163
-
164
-
165
-
166
-
167
-
168
 |
 |
