HP LaserJet Enterprise MFP M630 LaserJet Analog Fax Accessory 500 - Fax Guide - Page 108
Automatic tone adjustment, Enable or disable the fax printing schedule, Start, More Options
 |
View all HP LaserJet Enterprise MFP M630 manuals
Add to My Manuals
Save this manual to your list of manuals |
Page 108 highlights
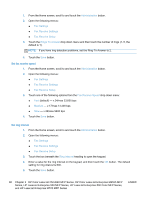
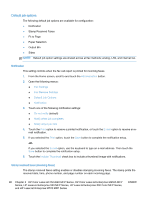
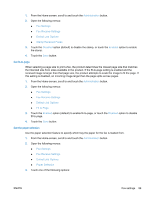
6. Touch the OK button to save the changes. 7. Touch the Start button to begin scanning. Automatic tone adjustment You can configure the product to automatically adjust the darkness, contract, and background cleanup settings on a page-by-page basis. For example, if the original document has some pages that are lighter than others, the resulting scanned image has a more uniform darkness setting for all pages. 1. From the Home screen, touch the Fax button. 2. Complete the fields on the first screen to specify the fax recipient information. 3. Touch the More Options button at the bottom of the screen. 4. Touch the Image Adjustment button. NOTE: If the Image Adjustment button is not on the first page of options, touch the More Options button again to scroll to the next page. 5. Touch the Automatic Tone check box to select it. 6. Touch the OK button to save the changes. 7. Touch the Start button to begin scanning. Enable or disable the fax printing schedule NOTE: Before enabling a fax-printing schedule, a schedule must be created. 1. From the Home screen, scroll to and touch the Administration button. 2. Open the following menus: ● Fax Settings ● Fax Receive Settings ● Fax Printing Schedule 3. Touch the Use Fax Printing Schedule option. 4. Touch the Schedule button. 5. Touch Fax Printing Mode. 6. Touch the green plus sign to open the Schedule a Weekly Fax Event screen. 7. Scroll to and touch Fax Printing Mode. 8. Select an option under the Event Type heading: ● Print incoming faxes ● Store incoming faxes 9. Touch the Time fields to open the keypad and then enter the hour and minute values when incoming faxes will be printed or stored. 96 Chapter 3 HP Color LaserJet CM 4540 MFP Series, HP Color LaserJet Enterprise M4555 MFP Series, HP LaserJet Enterprise 500 MFP Series, HP LaserJet Enterprise 500 Color MFP Series, and HP LaserJet Enterprise M725 MFP Series ENWW
-
 1
1 -
2
-
3
-
4
-
5
-
6
-
7
-
8
-
9
-
10
-
11
-
12
-
13
-
14
-
15
-
16
-
17
-
18
-
19
-
20
-
21
-
22
-
23
-
24
-
25
-
26
-
27
-
28
-
29
-
30
-
31
-
32
-
33
-
34
-
35
-
36
-
37
-
38
-
39
-
40
-
41
-
42
-
43
-
44
-
45
-
46
-
47
-
48
-
49
-
50
-
51
-
52
-
53
-
54
-
55
-
56
-
57
-
58
-
59
-
60
-
61
-
62
-
63
-
64
-
65
-
66
-
67
-
68
-
69
-
70
-
71
-
72
-
73
-
74
-
75
-
76
-
77
-
78
-
79
-
80
-
81
-
82
-
83
-
84
-
85
-
86
-
87
-
88
-
89
-
90
-
91
-
92
-
93
-
94
-
95
-
96
-
97
-
98
-
99
-
100
-
101
-
102
-
 103
103 -
 104
104 -
 105
105 -
 106
106 -
 107
107 -
 108
108 -
 109
109 -
 110
110 -
 111
111 -
 112
112 -
 113
113 -
114
-
115
-
116
-
117
-
118
-
119
-
120
-
121
-
122
-
123
-
124
-
125
-
126
-
127
-
128
-
129
-
130
-
131
-
132
-
133
-
134
-
135
-
136
-
137
-
138
-
139
-
140
-
141
-
142
-
143
-
144
-
145
-
146
-
147
-
148
-
149
-
150
-
151
-
152
-
153
-
154
-
155
-
156
-
157
-
158
-
159
-
160
-
161
-
162
-
163
-
164
-
165
-
166
-
167
-
168
 |
 |
