HP LaserJet Enterprise MFP M630 LaserJet Analog Fax Accessory 500 - Fax Guide - Page 23
Connect the fax accessory to a phone line, Verify fax operation, Required fax settings
 |
View all HP LaserJet Enterprise MFP M630 manuals
Add to My Manuals
Save this manual to your list of manuals |
Page 23 highlights
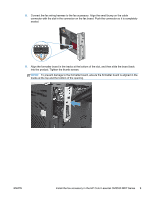
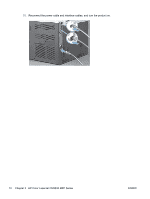
Connect the fax accessory to a phone line When connecting the fax accessory to a phone line, ensure that the phone line being used for the fax accessory is a dedicated line that is not used by any other devices. Also, this line should be an analog line because the fax will not function correctly if it is connected to some digital PBX systems. If you are not sure whether you have an analog or digital phone line, contact your telecom provider. NOTE: HP recommends using the phone cord that comes with the fax accessory to ensure that the accessory functions correctly. Follow these instructions to connect the fax accessory to a phone jack. 1. Locate the phone cord that is included with the fax accessory kit. Connect one end of the phone cord into the fax accessory phone jack that is on the fax card. Push the connector until it clicks. CAUTION: Be sure to connect the phone line to the fax accessory port, which is located in the center of the fax card. Do not connect the phone line to the HP Jetdirect port, which is nearer the bottom of the formatter. 2. Connect the other end of the phone cord into the phone jack on the wall. Push the connector until it clicks or until it is securely seated. Because different types of connectors are used in different countries/regions, the connector might not make an audible click. Verify fax operation When the fax accessory is installed and operating correctly, the fax icon displays on the product control panel. If the fax accessory has just been installed but has not been configured, the fax icon is grayed-out. If this occurs, use the instructions that follow to configure the fax accessory. Required fax settings After the fax accessory is installed, you must configure certain settings before you can use the accessory. If these settings are not configured, the fax icon is grayed-out. These settings include: ● Date and time ● Country/region ● Fax header (phone number and company name) This information is used in the fax header, which is printed on all outgoing faxes. NOTE: When first installed, the fax accessory might read some of these settings from the product; therefore, a value may already be set. You should check the values to verify that they are set and correct. NOTE: In the U.S. and many other countries/regions, setting the date, time, country/region, phone number, and company name is a legal requirement for fax. Fax Configuration Wizard The Fax Configuration Wizard guides you through a step-by-step procedure to configure fax settings that are required to use the fax feature. If the settings are not configured, the fax feature is disabled. The following is a list of fax settings that are configured using the wizard: ENWW Connect the fax accessory to a phone line 11
-
 1
1 -
2
-
3
-
4
-
5
-
6
-
7
-
8
-
9
-
10
-
11
-
12
-
13
-
14
-
15
-
16
-
17
-
 18
18 -
 19
19 -
 20
20 -
 21
21 -
 22
22 -
 23
23 -
 24
24 -
 25
25 -
 26
26 -
 27
27 -
 28
28 -
29
-
30
-
31
-
32
-
33
-
34
-
35
-
36
-
37
-
38
-
39
-
40
-
41
-
42
-
43
-
44
-
45
-
46
-
47
-
48
-
49
-
50
-
51
-
52
-
53
-
54
-
55
-
56
-
57
-
58
-
59
-
60
-
61
-
62
-
63
-
64
-
65
-
66
-
67
-
68
-
69
-
70
-
71
-
72
-
73
-
74
-
75
-
76
-
77
-
78
-
79
-
80
-
81
-
82
-
83
-
84
-
85
-
86
-
87
-
88
-
89
-
90
-
91
-
92
-
93
-
94
-
95
-
96
-
97
-
98
-
99
-
100
-
101
-
102
-
103
-
104
-
105
-
106
-
107
-
108
-
109
-
110
-
111
-
112
-
113
-
114
-
115
-
116
-
117
-
118
-
119
-
120
-
121
-
122
-
123
-
124
-
125
-
126
-
127
-
128
-
129
-
130
-
131
-
132
-
133
-
134
-
135
-
136
-
137
-
138
-
139
-
140
-
141
-
142
-
143
-
144
-
145
-
146
-
147
-
148
-
149
-
150
-
151
-
152
-
153
-
154
-
155
-
156
-
157
-
158
-
159
-
160
-
161
-
162
-
163
-
164
-
165
-
166
-
167
-
168
 |
 |
