HP LaserJet Enterprise MFP M630 LaserJet Analog Fax Accessory 500 - Fax Guide - Page 42
Default job options, Change notification settings, Stamp received faxes (incoming faxes), Fit
 |
View all HP LaserJet Enterprise MFP M630 manuals
Add to My Manuals
Save this manual to your list of manuals |
Page 42 highlights
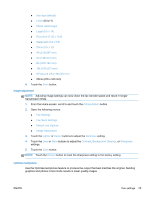
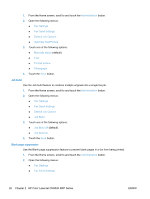
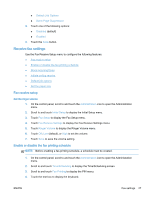
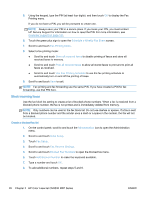
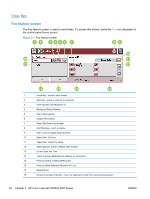
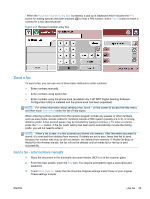
Default job options The following default job options are available for configuration: ● Notification ● Stamp Received Faxes ● Fit to Page ● Paper Selection ● Output Bin ● Sides NOTE: Default job option settings are shared across all fax methods; analog, LAN, and internet fax. Change notification settings Notification selects when and how you are notified of the status of an outgoing fax. This setting applies to the current fax only. To change the setting permanently, change the default setting. 1. On the control panel, touch the Fax icon to open the Fax screen. 2. Touch More Options. 3. Touch Notification. 4. Select a notification setting: ● Touch None to turn off notification. ● Touch This job to enable notification for the current job. ● Touch On error to enable error notification only for the current job. 5. Touch Print to receive a printed notification, or touch E-mail to receive an e-mail notification. 6. If you selected Print, touch OK to complete the notification setup. -orIf you selected E-mail, use the keyboard to type an e-mail address. Then touch OK to complete the notification setup. Stamp received faxes (incoming faxes) The stamp received faxes setting enables or disables stamping incoming faxes. The stamp prints the received date, time, phone number, and page number on each incoming page. 1. On the control panel, scroll to and touch the Administration icon to open the Administration menu. 2. Touch Default Job Options and then Default Fax Options. 3. Touch Fax Receive to see the Fax Receive setting. 4. Touch Stamp Received Faxes to see the settings. 30 Chapter 2 HP Color LaserJet CM3530 MFP Series ENWW
-
 1
1 -
2
-
3
-
4
-
5
-
6
-
7
-
8
-
9
-
10
-
11
-
12
-
13
-
14
-
15
-
16
-
17
-
18
-
19
-
20
-
21
-
22
-
23
-
24
-
25
-
26
-
27
-
28
-
29
-
30
-
31
-
32
-
33
-
34
-
35
-
36
-
 37
37 -
 38
38 -
 39
39 -
 40
40 -
 41
41 -
 42
42 -
 43
43 -
 44
44 -
 45
45 -
 46
46 -
 47
47 -
48
-
49
-
50
-
51
-
52
-
53
-
54
-
55
-
56
-
57
-
58
-
59
-
60
-
61
-
62
-
63
-
64
-
65
-
66
-
67
-
68
-
69
-
70
-
71
-
72
-
73
-
74
-
75
-
76
-
77
-
78
-
79
-
80
-
81
-
82
-
83
-
84
-
85
-
86
-
87
-
88
-
89
-
90
-
91
-
92
-
93
-
94
-
95
-
96
-
97
-
98
-
99
-
100
-
101
-
102
-
103
-
104
-
105
-
106
-
107
-
108
-
109
-
110
-
111
-
112
-
113
-
114
-
115
-
116
-
117
-
118
-
119
-
120
-
121
-
122
-
123
-
124
-
125
-
126
-
127
-
128
-
129
-
130
-
131
-
132
-
133
-
134
-
135
-
136
-
137
-
138
-
139
-
140
-
141
-
142
-
143
-
144
-
145
-
146
-
147
-
148
-
149
-
150
-
151
-
152
-
153
-
154
-
155
-
156
-
157
-
158
-
159
-
160
-
161
-
162
-
163
-
164
-
165
-
166
-
167
-
168
 |
 |
