HP LaserJet Enterprise MFP M630 LaserJet Analog Fax Accessory 500 - Fax Guide - Page 41
Remove numbers from the blocked-fax list, Initiate polling receive, Clear all Blocked Numbers
 |
View all HP LaserJet Enterprise MFP M630 manuals
Add to My Manuals
Save this manual to your list of manuals |
Page 41 highlights
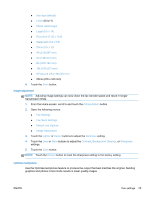
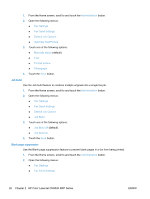
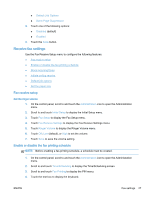
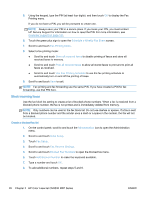
Remove numbers from the blocked-fax list 1. On the control panel, scroll to and touch the Administration icon to open the Administration menu. 2. Scroll to and touch Initial Setup. 3. Touch Fax Setup. 4. Scroll to and touch Fax Receive Settings. 5. Scroll to and touch Blocked Fax Numbers to open the blocked fax menu. 6. Touch Remove Blocked Number to make the keyboard available. 7. Type a number and touch OK. 8. To add additional numbers, repeat steps 5 and 6. Clear all numbers from the blocked-fax list 1. On the control panel, scroll to and touch the Administration icon to open the Administration menu. 2. Scroll to and touch Initial Setup. 3. Touch Fax Setup. 4. Scroll to and touch Fax Receive Settings. 5. Scroll to and touch Blocked Fax Numbers to open the blocked fax menu. 6. Touch Clear all Blocked Numbers to make the keyboard available. 7. Touch Yes to clear all numbers from the list, or touch No to exit and retain the numbers. Initiate polling receive Some fax machines can hold a fax until another fax machine requests that the fax be sent. When a product polls another fax machine that is holding a fax and requests that the held fax be sent to the product, this is known as polling receive. 1. On the control panel, touch the Fax icon to display the Fax screen. 2. Touch More Options to display the options screen. 3. Scroll to page 3. 4. Touch Fax Polling to display the Fax Polling screen. 5. Touch the text box to display the keyboard. 6. Using the keypad, type a polling receive number, and then touch Start. 7. The number entered is dialed. If a stored fax is being held at the fax machine dialed, that fax is transmitted to the product and printed. If no fax is held, a No Fax is Available message will be displayed. If the fax machine does not support the polling feature, a Poll Invalid error message will be shown. ENWW Fax settings 29
-
 1
1 -
2
-
3
-
4
-
5
-
6
-
7
-
8
-
9
-
10
-
11
-
12
-
13
-
14
-
15
-
16
-
17
-
18
-
19
-
20
-
21
-
22
-
23
-
24
-
25
-
26
-
27
-
28
-
29
-
30
-
31
-
32
-
33
-
34
-
35
-
 36
36 -
 37
37 -
 38
38 -
 39
39 -
 40
40 -
 41
41 -
 42
42 -
 43
43 -
 44
44 -
 45
45 -
 46
46 -
47
-
48
-
49
-
50
-
51
-
52
-
53
-
54
-
55
-
56
-
57
-
58
-
59
-
60
-
61
-
62
-
63
-
64
-
65
-
66
-
67
-
68
-
69
-
70
-
71
-
72
-
73
-
74
-
75
-
76
-
77
-
78
-
79
-
80
-
81
-
82
-
83
-
84
-
85
-
86
-
87
-
88
-
89
-
90
-
91
-
92
-
93
-
94
-
95
-
96
-
97
-
98
-
99
-
100
-
101
-
102
-
103
-
104
-
105
-
106
-
107
-
108
-
109
-
110
-
111
-
112
-
113
-
114
-
115
-
116
-
117
-
118
-
119
-
120
-
121
-
122
-
123
-
124
-
125
-
126
-
127
-
128
-
129
-
130
-
131
-
132
-
133
-
134
-
135
-
136
-
137
-
138
-
139
-
140
-
141
-
142
-
143
-
144
-
145
-
146
-
147
-
148
-
149
-
150
-
151
-
152
-
153
-
154
-
155
-
156
-
157
-
158
-
159
-
160
-
161
-
162
-
163
-
164
-
165
-
166
-
167
-
168
 |
 |
