HP LaserJet Enterprise MFP M630 LaserJet Analog Fax Accessory 500 - Fax Guide - Page 47
Send a fax, Send a fax - enter numbers manually
 |
View all HP LaserJet Enterprise MFP M630 manuals
Add to My Manuals
Save this manual to your list of manuals |
Page 47 highlights
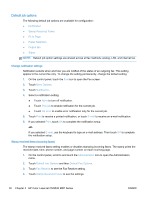
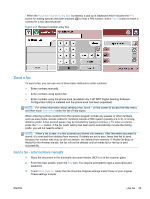
1 When the Recipient Number Entry Box is pressed, a pop up is displayed which includes the PIN button for adding special character brackets ([ ]) to hide a PIN number, and a Pause button to insert a comma for a two second pause. Figure 2-2 Recipient number entry box Send a fax To send a fax, you can use one of three basic methods to enter numbers: ● Enter numbers manually. ● Enter numbers using speed dial. ● Enter numbers using the phone book (available only if HP MFP Digital Sending Software Configuration Utility is installed and the phone book has been populated). NOTE: For online information about sending a fax, touch ? on the screen to access the help menu, and then touch Send a fax under the list of help topics. When entering a phone number from the numeric keypad, include any pauses or other numbers, such as area codes, access codes for numbers outside a PBX system (usually a 9 or 0), or a longdistance prefix. A two second pause may be included by typing a comma (,). To enter a comma, press the Pause button. If the fax prefix setting has been set to automatically include the dialing prefix, you will not need to enter it. NOTE: When a fax is sent, it is first scanned and stored into memory. After the entire document is stored, it is sent and then deleted from memory. If redials are set to zero, faxes that fail to send, because the number was busy or did not answer, are deleted from memory. If Redial-On-Busy or Redial-On-No-Answer are set, the fax will not be deleted until all retries fail or the fax is sent successfully. Send a fax - enter numbers manually 1. Place the document in the automatic document feeder (ADF) or on the scanner glass. 2. From the main screen, touch the Fax icon. You may be prompted to type a user name and password. 3. Touch More Options. Verify that the Describe Original settings match those of your original. These settings include: ENWW Use fax 35
-
 1
1 -
2
-
3
-
4
-
5
-
6
-
7
-
8
-
9
-
10
-
11
-
12
-
13
-
14
-
15
-
16
-
17
-
18
-
19
-
20
-
21
-
22
-
23
-
24
-
25
-
26
-
27
-
28
-
29
-
30
-
31
-
32
-
33
-
34
-
35
-
36
-
37
-
38
-
39
-
40
-
41
-
 42
42 -
 43
43 -
 44
44 -
 45
45 -
 46
46 -
 47
47 -
 48
48 -
 49
49 -
 50
50 -
 51
51 -
 52
52 -
53
-
54
-
55
-
56
-
57
-
58
-
59
-
60
-
61
-
62
-
63
-
64
-
65
-
66
-
67
-
68
-
69
-
70
-
71
-
72
-
73
-
74
-
75
-
76
-
77
-
78
-
79
-
80
-
81
-
82
-
83
-
84
-
85
-
86
-
87
-
88
-
89
-
90
-
91
-
92
-
93
-
94
-
95
-
96
-
97
-
98
-
99
-
100
-
101
-
102
-
103
-
104
-
105
-
106
-
107
-
108
-
109
-
110
-
111
-
112
-
113
-
114
-
115
-
116
-
117
-
118
-
119
-
120
-
121
-
122
-
123
-
124
-
125
-
126
-
127
-
128
-
129
-
130
-
131
-
132
-
133
-
134
-
135
-
136
-
137
-
138
-
139
-
140
-
141
-
142
-
143
-
144
-
145
-
146
-
147
-
148
-
149
-
150
-
151
-
152
-
153
-
154
-
155
-
156
-
157
-
158
-
159
-
160
-
161
-
162
-
163
-
164
-
165
-
166
-
167
-
168
 |
 |
