HP LaserJet Enterprise MFP M630 LaserJet Analog Fax Accessory 500 - Fax Guide - Page 20
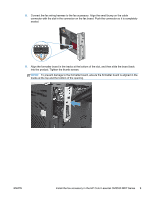
Locate the fax-accessory support on the formatter, and unwind the fax wiring harness from
 |
View all HP LaserJet Enterprise MFP M630 manuals
Add to My Manuals
Save this manual to your list of manuals |
Page 20 highlights
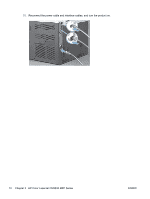
5. If necessary, remove the label that covers the fax port on the formatter. 6. Remove the fax accessory from its packaging. CAUTION: The formatter board and the fax accessory card contain parts that are sensitive to electrostatic discharge (ESD). When handling the formatter board or the fax accessory card, use static protection such as the following: 1) a grounding wrist strap that is connected to the metal frame of the product. 2) Hold the metal frame of the formatter in your hand. Avoid touching components on the formatter board or the fax accessory card. 7. Locate the fax-accessory support on the formatter, and unwind the fax wiring harness from the support. Do not disconnect the fax wiring harness from the formatter. Place the fax accessory into the support. Press down so the fax-accessory is securely seated in the support. Verify that the telephone connector on the fax accessory aligns with the opening on the metal frame of the formatter. 8 Chapter 2 HP Color LaserJet CM3530 MFP Series ENWW
-
 1
1 -
2
-
3
-
4
-
5
-
6
-
7
-
8
-
9
-
10
-
11
-
12
-
13
-
14
-
 15
15 -
 16
16 -
 17
17 -
 18
18 -
 19
19 -
 20
20 -
 21
21 -
 22
22 -
 23
23 -
 24
24 -
 25
25 -
26
-
27
-
28
-
29
-
30
-
31
-
32
-
33
-
34
-
35
-
36
-
37
-
38
-
39
-
40
-
41
-
42
-
43
-
44
-
45
-
46
-
47
-
48
-
49
-
50
-
51
-
52
-
53
-
54
-
55
-
56
-
57
-
58
-
59
-
60
-
61
-
62
-
63
-
64
-
65
-
66
-
67
-
68
-
69
-
70
-
71
-
72
-
73
-
74
-
75
-
76
-
77
-
78
-
79
-
80
-
81
-
82
-
83
-
84
-
85
-
86
-
87
-
88
-
89
-
90
-
91
-
92
-
93
-
94
-
95
-
96
-
97
-
98
-
99
-
100
-
101
-
102
-
103
-
104
-
105
-
106
-
107
-
108
-
109
-
110
-
111
-
112
-
113
-
114
-
115
-
116
-
117
-
118
-
119
-
120
-
121
-
122
-
123
-
124
-
125
-
126
-
127
-
128
-
129
-
130
-
131
-
132
-
133
-
134
-
135
-
136
-
137
-
138
-
139
-
140
-
141
-
142
-
143
-
144
-
145
-
146
-
147
-
148
-
149
-
150
-
151
-
152
-
153
-
154
-
155
-
156
-
157
-
158
-
159
-
160
-
161
-
162
-
163
-
164
-
165
-
166
-
167
-
168
 |
 |
