HP t505 Administrator Guide 7 - Page 26
Configuring the aggregation server, Display preferences, Configuring printers, printers
 |
View all HP t505 manuals
Add to My Manuals
Save this manual to your list of manuals |
Page 26 highlights
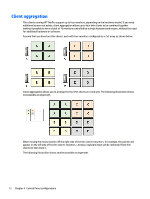
Configuring the aggregation server To configure the aggregation server: 1. Select Peripherals > Client Aggregation in the Control Panel. 2. Click Server. 3. The aggregation server is displayed in a blue box that contains its hostname. Click and drag the aggregation server to the desired location in the 4x4 grid. 4. Click the location in the 4x4 grid where you want to place the first aggregation client, type its hostname or IP address, and then press Enter. The aggregation client is displayed in a green box. 5. Add up to two additional aggregation clients in the 4x4 grid, if desired. Placement of the aggregation server and the aggregation clients in the 4x4 grid can be modified at any time by clicking and dragging the corresponding box to a new location. Once the aggregation clients and the aggregation server have been configured, they automatically attempt to establish encrypted communications with each other. Click Status to view the connection status between computers. Display preferences HP ThinPro allows you to create profiles for display preferences and apply different profiles to different monitors. A profile includes resolution, refresh rate, bit depth, and orientation. To configure display profiles: 1. Select Peripherals > Display Preferences in the Control Panel. 2. Configure the options as necessary, and then click Apply. NOTE: The options may differ depending on the hardware model. See the following tips about when customizing display profiles would be useful: ● Some applications might require a specific resolution or bit depth to function properly. ● Some applications might require the display to be rotated. ● Using a 16-bit color depth should improve Citrix and RDP connection performance because less data has to be transmitted over the network or sent to the graphics chip. ● AMD-based platforms (t520, t610, t620) offer only 32-bit color depth. The t505 and t510 offer either 16-bit or 32-bit color depth. In all cases, 32-bit color depth actually uses 24 bits. ● An administrator might want to standardize on one display profile, even though there are many different monitors across the organization. Configuring printers To configure a printer: 1. Select Peripherals > Printers in the Control Panel. 2. In the Printing dialog, click Add . 3. In the New Printer dialog, select the printer to configure, and then click Forward. 14 Chapter 4 Control Panel configurations
-
 1
1 -
2
-
3
-
4
-
5
-
6
-
7
-
8
-
9
-
10
-
11
-
12
-
13
-
14
-
15
-
16
-
17
-
18
-
19
-
20
-
 21
21 -
 22
22 -
 23
23 -
 24
24 -
 25
25 -
 26
26 -
 27
27 -
 28
28 -
 29
29 -
 30
30 -
 31
31 -
32
-
33
-
34
-
35
-
36
-
37
-
38
-
39
-
40
-
41
-
42
-
43
-
44
-
45
-
46
-
47
-
48
-
49
-
50
-
51
-
52
-
53
-
54
-
55
-
56
-
57
-
58
-
59
-
60
-
61
-
62
-
63
-
64
-
65
-
66
-
67
-
68
-
69
-
70
-
71
-
72
-
73
-
74
-
75
-
76
-
77
-
78
-
79
-
80
-
81
-
82
-
83
-
84
-
85
-
86
-
87
-
88
-
89
-
90
-
91
-
92
-
93
-
94
-
95
-
96
-
97
-
98
-
99
-
100
-
101
-
102
-
103
-
104
-
105
-
106
-
107
-
108
-
109
-
110
-
111
-
112
-
113
-
114
-
115
-
116
-
117
-
118
-
119
-
120
-
121
-
122
-
123
-
124
-
125
-
126
-
127
-
128
-
129
-
130
-
131
-
132
-
133
-
134
-
135
-
136
-
137
-
138
-
139
-
140
-
141
-
142
-
143
-
144
-
145
-
146
-
147
-
148
-
149
-
150
-
151
-
152
-
153
-
154
-
155
-
156
-
157
-
158
-
159
-
160
-
161
-
162
-
163
-
164
-
165
-
166
-
167
-
168
-
169
 |
 |
