IBM 8862 Hardware Maintenance Manual - Page 36
Forcing, power-on
 |
UPC - 000435172679
View all IBM 8862 manuals
Add to My Manuals
Save this manual to your list of manuals |
Page 36 highlights
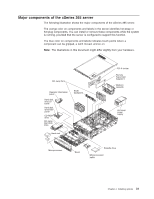
5. Reinstall the cover and reconnect the external cables and power cords; then, turn on the server and access the Configuration/Setup Utility menu to change the power-on password. 6. Repeat steps 2 on page 25 and 3 on page 25; then, move the jumper back to pins 1 and 2. 7. Reinstall any components that were removed in step 3 on page 25; then, reinstall the cover and reconnect the external cables and power cord. Changing the position of this jumper does not affect the administrator password check if an administrator password is set. Attention: If an administrator password is set and then forgotten, it cannot be overridden or removed. You must replace the operator information panel. Forcing a power-on Complete the following steps to turn on the server without pressing the power-on button: 1. Read "Safety information" on page 147 and "Handling static-sensitive devices" on page 30. 2. Turn off the server and peripheral devices and disconnect all external cables and power cords; then, remove hot-swap fan number 2 (see "Replacing a hot-swap fan" on page 55). Force power-on jumper (J10) Microprocessor 3 VRM error LED Light-path diagnostics button Microprocessor 4 VRM error LED Microprocessor 3 VRM connector Microprocessor 4 VRM connector Microprocessor 1 socket Microprocessor 1 error LED Microprocessor 2 error LED Microprocessor 4 socket Light-path test LED Microprocessor 4 error LED Microprocessor 3 socket Microprocessor 2 socket Microprocessor 3 error LED 3. Locate the force power-on jumper (J10), and place a jumper over the two pins. 4. Reinsert the microprocessor tray assembly fully into the server and reconnect the cables and power cords. The server will turn on. 5. To return the jumper to its default position, repeat step 2; then, remove the jumper from J10. 6. Reinsert the microprocessor tray assembly fully into the server and reconnect the cables and power cords. 26 IBM xSeries 365 Types 8861, 8862: Hardware Maintenance Manual and Troubleshooting Guide
-
 1
1 -
2
-
3
-
4
-
5
-
6
-
7
-
8
-
9
-
10
-
11
-
12
-
13
-
14
-
15
-
16
-
17
-
18
-
19
-
20
-
21
-
22
-
23
-
24
-
25
-
26
-
27
-
28
-
29
-
30
-
 31
31 -
 32
32 -
 33
33 -
 34
34 -
 35
35 -
 36
36 -
 37
37 -
 38
38 -
 39
39 -
 40
40 -
 41
41 -
42
-
43
-
44
-
45
-
46
-
47
-
48
-
49
-
50
-
51
-
52
-
53
-
54
-
55
-
56
-
57
-
58
-
59
-
60
-
61
-
62
-
63
-
64
-
65
-
66
-
67
-
68
-
69
-
70
-
71
-
72
-
73
-
74
-
75
-
76
-
77
-
78
-
79
-
80
-
81
-
82
-
83
-
84
-
85
-
86
-
87
-
88
-
89
-
90
-
91
-
92
-
93
-
94
-
95
-
96
-
97
-
98
-
99
-
100
-
101
-
102
-
103
-
104
-
105
-
106
-
107
-
108
-
109
-
110
-
111
-
112
-
113
-
114
-
115
-
116
-
117
-
118
-
119
-
120
-
121
-
122
-
123
-
124
-
125
-
126
-
127
-
128
-
129
-
130
-
131
-
132
-
133
-
134
-
135
-
136
-
137
-
138
-
139
-
140
-
141
-
142
-
143
-
144
-
145
-
146
-
147
-
148
-
149
-
150
-
151
-
152
-
153
-
154
-
155
-
156
-
157
-
158
-
159
-
160
-
161
-
162
-
163
-
164
-
165
-
166
-
167
-
168
-
169
-
170
-
171
-
172
-
173
-
174
-
175
-
176
-
177
-
178
-
179
-
180
-
181
-
182
-
183
-
184
-
185
-
186
-
187
-
188
-
189
-
190
-
191
-
192
-
193
-
194
-
195
-
196
-
197
-
198
-
199
-
200
-
201
-
202
-
203
-
204
-
205
-
206
-
207
-
208
-
209
-
210
-
211
-
212
 |
 |
