IBM 8862 Hardware Maintenance Manual - Page 66
Replacing, memory, cassette
 |
UPC - 000435172679
View all IBM 8862 manuals
Add to My Manuals
Save this manual to your list of manuals |
Page 66 highlights
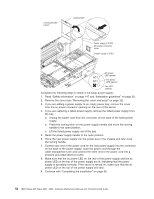
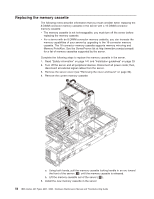
Replacing the memory cassette The following notes describe information that you must consider when replacing the 8-DIMM-connector memory cassette in the server with a 16-DIMM-connector memory cassette: v The memory cassette is not hot-swappable; you must turn off the server before replacing the memory cassette. v For a server with an 8-DIMM-connector memory cassette, you can increase the memory capabilities of your server by upgrading to the 16-connector memory cassette. The 16-connector memory cassette supports memory mirroring and Memory ProteXion. See the ServerProven list at http://www.ibm.com/pc/compat/ for a list of memory cassettes supported by the server. Complete the following steps to replace the memory cassette in the server. 1. Read "Safety information" on page 147 and "Installation guidelines" on page 29. 2. Turn off the server and all peripheral devices. Disconnect all power cords; then, disconnect all external signal cables from the server. 3. Remove the server cover (see "Removing the cover and bezel" on page 32). 4. Remove the current memory cassette: a. Using both hands, pull the memory cassette locking handle in an arc toward the front of the server ( 1 ) until the memory cassette is released. b. Lift the memory cassette out of the server ( 2 ). 5. Install the new memory cassette in the server: 56 IBM xSeries 365 Types 8861, 8862: Hardware Maintenance Manual and Troubleshooting Guide
-
 1
1 -
2
-
3
-
4
-
5
-
6
-
7
-
8
-
9
-
10
-
11
-
12
-
13
-
14
-
15
-
16
-
17
-
18
-
19
-
20
-
21
-
22
-
23
-
24
-
25
-
26
-
27
-
28
-
29
-
30
-
31
-
32
-
33
-
34
-
35
-
36
-
37
-
38
-
39
-
40
-
41
-
42
-
43
-
44
-
45
-
46
-
47
-
48
-
49
-
50
-
51
-
52
-
53
-
54
-
55
-
56
-
57
-
58
-
59
-
60
-
 61
61 -
 62
62 -
 63
63 -
 64
64 -
 65
65 -
 66
66 -
 67
67 -
 68
68 -
 69
69 -
 70
70 -
 71
71 -
72
-
73
-
74
-
75
-
76
-
77
-
78
-
79
-
80
-
81
-
82
-
83
-
84
-
85
-
86
-
87
-
88
-
89
-
90
-
91
-
92
-
93
-
94
-
95
-
96
-
97
-
98
-
99
-
100
-
101
-
102
-
103
-
104
-
105
-
106
-
107
-
108
-
109
-
110
-
111
-
112
-
113
-
114
-
115
-
116
-
117
-
118
-
119
-
120
-
121
-
122
-
123
-
124
-
125
-
126
-
127
-
128
-
129
-
130
-
131
-
132
-
133
-
134
-
135
-
136
-
137
-
138
-
139
-
140
-
141
-
142
-
143
-
144
-
145
-
146
-
147
-
148
-
149
-
150
-
151
-
152
-
153
-
154
-
155
-
156
-
157
-
158
-
159
-
160
-
161
-
162
-
163
-
164
-
165
-
166
-
167
-
168
-
169
-
170
-
171
-
172
-
173
-
174
-
175
-
176
-
177
-
178
-
179
-
180
-
181
-
182
-
183
-
184
-
185
-
186
-
187
-
188
-
189
-
190
-
191
-
192
-
193
-
194
-
195
-
196
-
197
-
198
-
199
-
200
-
201
-
202
-
203
-
204
-
205
-
206
-
207
-
208
-
209
-
210
-
211
-
212
 |
 |
