IBM 8862 Hardware Maintenance Manual - Page 46
Removing, PCI-X, adapter, Installing, hot-swap, drive
 |
UPC - 000435172679
View all IBM 8862 manuals
Add to My Manuals
Save this manual to your list of manuals |
Page 46 highlights
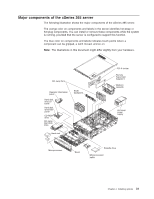
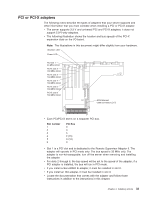
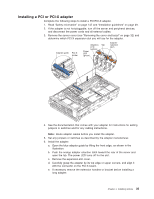
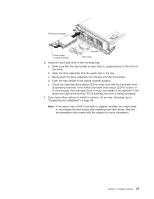
Attention: When you install an adapter, avoid touching the components and gold-edge connectors on the adapter. Be sure the adapter is correctly seated in the connector. Incorrectly seated adapters might cause damage to the I/O board or to the adapter. f. Press the adapter firmly into the adapter connector. g. Push down on the blue adapter guide to stabilize the adapter. h. Close the tab; then, push down on the blue adapter retention latch until it clicks into place, securing the adapter. 7. Connect any required cables to the adapter. 8. If you have other options to install or remove, do so now; otherwise, go to "Completing the installation" on page 58. Removing a PCI or PCI-X adapter To remove an adapter, complete the following steps: 1. Complete steps 1 on page 35 through 3 on page 35. 2. Open the blue adapter guide (see step 6a on page 35) and the orange adapter retention latch (see step 6b on page 35). 3. If the adapter has any internal cables, disconnect them. 4. Carefully grasp the adapter by its top edge or upper corners and pull the adapter up and out of the server. 5. If the adapter slot will remain empty, close the blue adapter guide and the orange adapter retention latch, and replace the expansion slot cover. 6. If you have other options to install or remove, do so now; otherwise, go to "Completing the installation" on page 58. Installing a hot-swap hard disk drive The following notes describe the types of hard disk drives that your server supports and other information that you must consider when installing a hard disk drive: v The server supports up to six 26 mm (1-inch), 3.5-inch, hot-swap hard disk drives in the hot-swap bays. v Each hot-swap drive is in a tray, which has a green activity LED and an amber status LED in the upper-right corner. The activity LED flashes when the drive is active; the status LED is lit if the drive has an error. Each hot-swap drive has a single-connector-attached (SCA) connector, which connects directly into the hot-swap SCSI hard disk drive backplane. The backplane controls the SCSI IDs for the hot-swap drives. v Before you install a hot-swap hard disk drive, take the following actions: - Inspect the drive tray for any signs of damage. - Make sure that the drive is installed in the tray correctly. - If your server has an optional RAID adapter installed, see the documentation that comes with the adapter for information about installing a hard disk drive. Complete the following steps to install a hard disk drive: 1. Read "Safety information" on page 147 and "Installation guidelines" on page 29. 2. Remove the filler panel and air baffle from one of the empty hot-swap bays, if present. Attention: To maintain proper system cooling, do not operate the server for more than 10 minutes without either a drive or filler panel installed in each bay. 36 IBM xSeries 365 Types 8861, 8862: Hardware Maintenance Manual and Troubleshooting Guide
-
 1
1 -
2
-
3
-
4
-
5
-
6
-
7
-
8
-
9
-
10
-
11
-
12
-
13
-
14
-
15
-
16
-
17
-
18
-
19
-
20
-
21
-
22
-
23
-
24
-
25
-
26
-
27
-
28
-
29
-
30
-
31
-
32
-
33
-
34
-
35
-
36
-
37
-
38
-
39
-
40
-
 41
41 -
 42
42 -
 43
43 -
 44
44 -
 45
45 -
 46
46 -
 47
47 -
 48
48 -
 49
49 -
 50
50 -
 51
51 -
52
-
53
-
54
-
55
-
56
-
57
-
58
-
59
-
60
-
61
-
62
-
63
-
64
-
65
-
66
-
67
-
68
-
69
-
70
-
71
-
72
-
73
-
74
-
75
-
76
-
77
-
78
-
79
-
80
-
81
-
82
-
83
-
84
-
85
-
86
-
87
-
88
-
89
-
90
-
91
-
92
-
93
-
94
-
95
-
96
-
97
-
98
-
99
-
100
-
101
-
102
-
103
-
104
-
105
-
106
-
107
-
108
-
109
-
110
-
111
-
112
-
113
-
114
-
115
-
116
-
117
-
118
-
119
-
120
-
121
-
122
-
123
-
124
-
125
-
126
-
127
-
128
-
129
-
130
-
131
-
132
-
133
-
134
-
135
-
136
-
137
-
138
-
139
-
140
-
141
-
142
-
143
-
144
-
145
-
146
-
147
-
148
-
149
-
150
-
151
-
152
-
153
-
154
-
155
-
156
-
157
-
158
-
159
-
160
-
161
-
162
-
163
-
164
-
165
-
166
-
167
-
168
-
169
-
170
-
171
-
172
-
173
-
174
-
175
-
176
-
177
-
178
-
179
-
180
-
181
-
182
-
183
-
184
-
185
-
186
-
187
-
188
-
189
-
190
-
191
-
192
-
193
-
194
-
195
-
196
-
197
-
198
-
199
-
200
-
201
-
202
-
203
-
204
-
205
-
206
-
207
-
208
-
209
-
210
-
211
-
212
 |
 |
