IBM 8862 Hardware Maintenance Manual - Page 57
Remove, Replacing, hot-swap, microprocessor, microprocessor-tray, release, latch, levers, heavy.,
 |
UPC - 000435172679
View all IBM 8862 manuals
Add to My Manuals
Save this manual to your list of manuals |
Page 57 highlights
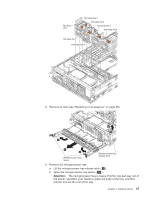
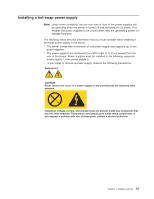
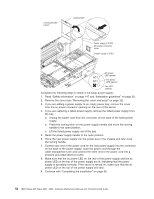
Fan Error LED Hot-swap fan 5 Hot-swap fan 6 Hot-swap fan 3 Hot-swap fan 4 Hot-swap fan 1 Hot-swap fan 2 5. Remove all fans (see "Replacing a hot-swap fan" on page 55). Microprocessor-tray levers Microprocessor-tray release latch 6. Remove the microprocessor tray: a. Lift the microprocessor-tray release latch ( 1 ). b. Open the microprocessor-tray levers ( 2) ). Attention: The microprocessor tray is heavy. Pull the tray part-way out of the server, reposition your hands to grasp the body of the tray, and then pull the tray out the rest of the way. Chapter 4. Installing options 47
-
 1
1 -
2
-
3
-
4
-
5
-
6
-
7
-
8
-
9
-
10
-
11
-
12
-
13
-
14
-
15
-
16
-
17
-
18
-
19
-
20
-
21
-
22
-
23
-
24
-
25
-
26
-
27
-
28
-
29
-
30
-
31
-
32
-
33
-
34
-
35
-
36
-
37
-
38
-
39
-
40
-
41
-
42
-
43
-
44
-
45
-
46
-
47
-
48
-
49
-
50
-
51
-
 52
52 -
 53
53 -
 54
54 -
 55
55 -
 56
56 -
 57
57 -
 58
58 -
 59
59 -
 60
60 -
 61
61 -
 62
62 -
63
-
64
-
65
-
66
-
67
-
68
-
69
-
70
-
71
-
72
-
73
-
74
-
75
-
76
-
77
-
78
-
79
-
80
-
81
-
82
-
83
-
84
-
85
-
86
-
87
-
88
-
89
-
90
-
91
-
92
-
93
-
94
-
95
-
96
-
97
-
98
-
99
-
100
-
101
-
102
-
103
-
104
-
105
-
106
-
107
-
108
-
109
-
110
-
111
-
112
-
113
-
114
-
115
-
116
-
117
-
118
-
119
-
120
-
121
-
122
-
123
-
124
-
125
-
126
-
127
-
128
-
129
-
130
-
131
-
132
-
133
-
134
-
135
-
136
-
137
-
138
-
139
-
140
-
141
-
142
-
143
-
144
-
145
-
146
-
147
-
148
-
149
-
150
-
151
-
152
-
153
-
154
-
155
-
156
-
157
-
158
-
159
-
160
-
161
-
162
-
163
-
164
-
165
-
166
-
167
-
168
-
169
-
170
-
171
-
172
-
173
-
174
-
175
-
176
-
177
-
178
-
179
-
180
-
181
-
182
-
183
-
184
-
185
-
186
-
187
-
188
-
189
-
190
-
191
-
192
-
193
-
194
-
195
-
196
-
197
-
198
-
199
-
200
-
201
-
202
-
203
-
204
-
205
-
206
-
207
-
208
-
209
-
210
-
211
-
212
 |
 |

Hot-swap fan 1
Hot-swap fan 5
Hot-swap fan 6
Hot-swap fan 3
Hot-swap fan 4
Fan Error
LED
Hot-swap fan 2
5.
Remove
all
fans
(see
“Replacing
a
hot-swap
fan”
on
page
55).
Microprocessor-tray
levers
Microprocessor-tray
release latch
6.
Remove
the
microprocessor
tray:
a.
Lift
the
microprocessor-tray
release
latch
(
±1²
).
b.
Open
the
microprocessor-tray
levers
(
±2)²
).
Attention:
The
microprocessor
tray
is
heavy.
Pull
the
tray
part-way
out
of
the
server,
reposition
your
hands
to
grasp
the
body
of
the
tray,
and
then
pull
the
tray
out
the
rest
of
the
way.
Chapter
4.
Installing
options
47