IBM 8862 Hardware Maintenance Manual - Page 69
Connecting, cables
 |
UPC - 000435172679
View all IBM 8862 manuals
Add to My Manuals
Save this manual to your list of manuals |
Page 69 highlights
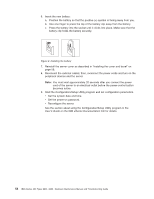
Connecting the cables This section describes how to connect cables to the server, with particular instructions for the RXE Expansion Port, RXE Management Port, and Ethernet connectors. When instructed, see the applicable documentation for more details. Note: The external power connection on the Remote Supervisor Adapter II is not supported on the xSeries 365 server. For details about the locations and functions of all of the ports, indicators, and connectors see "I/O connectors" on page 61. Remote Supervisor Adapter II ASM Remote Supervisor Adapter II USB Power-supply connector SCSI AC AC Remote Supervisor Adapter II Ethernet ( RJ-45) 1 2 3 4 5 6 RXE Management port Serial Keyboard Mouse RXE Expansion port Remote Supervisor Adapter II video Ethernet 2 USB 2 Ethernet 1 USB 1 The following illustration shows the cable routing for a typical server configuration. Detailed cabling instructions, including the use of the cable management arm (shipped with the server) are in the Rack Installation Instructions provided with the server. The illustrations in this document might differ slightly from your hardware. See the documentation that comes with any option you install for additional cabling instructions. It might be easier for you to route cables before you install certain options. If you have just connected the power cords of the server into an electrical outlet, wait 20 seconds before pressing the power-control button. Chapter 4. Installing options 59
-
 1
1 -
2
-
3
-
4
-
5
-
6
-
7
-
8
-
9
-
10
-
11
-
12
-
13
-
14
-
15
-
16
-
17
-
18
-
19
-
20
-
21
-
22
-
23
-
24
-
25
-
26
-
27
-
28
-
29
-
30
-
31
-
32
-
33
-
34
-
35
-
36
-
37
-
38
-
39
-
40
-
41
-
42
-
43
-
44
-
45
-
46
-
47
-
48
-
49
-
50
-
51
-
52
-
53
-
54
-
55
-
56
-
57
-
58
-
59
-
60
-
61
-
62
-
63
-
 64
64 -
 65
65 -
 66
66 -
 67
67 -
 68
68 -
 69
69 -
 70
70 -
 71
71 -
 72
72 -
 73
73 -
 74
74 -
75
-
76
-
77
-
78
-
79
-
80
-
81
-
82
-
83
-
84
-
85
-
86
-
87
-
88
-
89
-
90
-
91
-
92
-
93
-
94
-
95
-
96
-
97
-
98
-
99
-
100
-
101
-
102
-
103
-
104
-
105
-
106
-
107
-
108
-
109
-
110
-
111
-
112
-
113
-
114
-
115
-
116
-
117
-
118
-
119
-
120
-
121
-
122
-
123
-
124
-
125
-
126
-
127
-
128
-
129
-
130
-
131
-
132
-
133
-
134
-
135
-
136
-
137
-
138
-
139
-
140
-
141
-
142
-
143
-
144
-
145
-
146
-
147
-
148
-
149
-
150
-
151
-
152
-
153
-
154
-
155
-
156
-
157
-
158
-
159
-
160
-
161
-
162
-
163
-
164
-
165
-
166
-
167
-
168
-
169
-
170
-
171
-
172
-
173
-
174
-
175
-
176
-
177
-
178
-
179
-
180
-
181
-
182
-
183
-
184
-
185
-
186
-
187
-
188
-
189
-
190
-
191
-
192
-
193
-
194
-
195
-
196
-
197
-
198
-
199
-
200
-
201
-
202
-
203
-
204
-
205
-
206
-
207
-
208
-
209
-
210
-
211
-
212
 |
 |
