IBM 8862 Hardware Maintenance Manual - Page 68
Completing, installation, Installing, cover, bezel
 |
UPC - 000435172679
View all IBM 8862 manuals
Add to My Manuals
Save this manual to your list of manuals |
Page 68 highlights
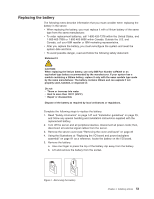
Completing the installation This section describes how to complete the installation. Installing the cover and bezel Complete the following steps to install the server cover and bezel: 1. Before installing the cover, check that all internal cables, adapters, and other components are installed and seated correctly and that you have not left loose tools or parts inside the server. 2. Move the cover-release latch to the open (up) position. Top cover Cover release latch Bezel xSeries 365 3. Position the cover on top of the server and press down on the cover-release latch. The cover slides forward into position. 4. Insert the tabs on the cover into the matching slots in the server chassis and slide the cover forward. 5. Press down on the cover-release latch. The cover-release latch slides the cover forward into position and locks the cover in place. 6. Insert the tabs on the bottom of the bezel into the matching holes on the server chassis. 7. Push the top of the bezel toward the server until the two tabs at the top of the sides of the bezel snap into place. 8. Slide the server fully into the rack cabinet. 9. If you disconnected any power cords or external cables from the server, reconnect the external cables first. If you are adding any new peripheral devices (see "Connecting the cables" on page 59 for details), you can then connect the external cables from those devices. Then, connect the power cords to properly grounded electrical outlets. Note: Depending on the options that you installed, you might need to run the Configuration/Setup Utility program to update the server configuration. See "Updating the server configuration" on page 60, "Using the Configuration/Setup Utility program" on page 11, and the User's Guide for more information. 58 IBM xSeries 365 Types 8861, 8862: Hardware Maintenance Manual and Troubleshooting Guide
-
 1
1 -
2
-
3
-
4
-
5
-
6
-
7
-
8
-
9
-
10
-
11
-
12
-
13
-
14
-
15
-
16
-
17
-
18
-
19
-
20
-
21
-
22
-
23
-
24
-
25
-
26
-
27
-
28
-
29
-
30
-
31
-
32
-
33
-
34
-
35
-
36
-
37
-
38
-
39
-
40
-
41
-
42
-
43
-
44
-
45
-
46
-
47
-
48
-
49
-
50
-
51
-
52
-
53
-
54
-
55
-
56
-
57
-
58
-
59
-
60
-
61
-
62
-
 63
63 -
 64
64 -
 65
65 -
 66
66 -
 67
67 -
 68
68 -
 69
69 -
 70
70 -
 71
71 -
 72
72 -
 73
73 -
74
-
75
-
76
-
77
-
78
-
79
-
80
-
81
-
82
-
83
-
84
-
85
-
86
-
87
-
88
-
89
-
90
-
91
-
92
-
93
-
94
-
95
-
96
-
97
-
98
-
99
-
100
-
101
-
102
-
103
-
104
-
105
-
106
-
107
-
108
-
109
-
110
-
111
-
112
-
113
-
114
-
115
-
116
-
117
-
118
-
119
-
120
-
121
-
122
-
123
-
124
-
125
-
126
-
127
-
128
-
129
-
130
-
131
-
132
-
133
-
134
-
135
-
136
-
137
-
138
-
139
-
140
-
141
-
142
-
143
-
144
-
145
-
146
-
147
-
148
-
149
-
150
-
151
-
152
-
153
-
154
-
155
-
156
-
157
-
158
-
159
-
160
-
161
-
162
-
163
-
164
-
165
-
166
-
167
-
168
-
169
-
170
-
171
-
172
-
173
-
174
-
175
-
176
-
177
-
178
-
179
-
180
-
181
-
182
-
183
-
184
-
185
-
186
-
187
-
188
-
189
-
190
-
191
-
192
-
193
-
194
-
195
-
196
-
197
-
198
-
199
-
200
-
201
-
202
-
203
-
204
-
205
-
206
-
207
-
208
-
209
-
210
-
211
-
212
 |
 |
