IBM 8862 Hardware Maintenance Manual - Page 60
microprocessor-tray
 |
UPC - 000435172679
View all IBM 8862 manuals
Add to My Manuals
Save this manual to your list of manuals |
Page 60 highlights
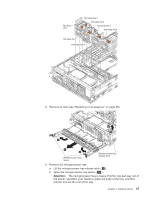
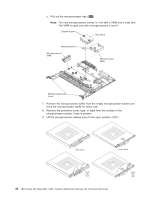
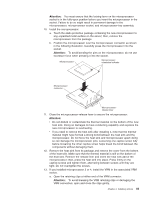
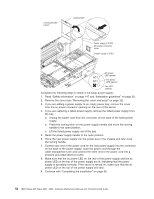
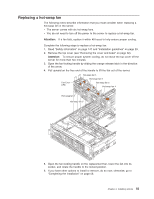
b. Turn the VRM so that the VRM keys align correctly with the connector. c. Insert the VRM into the connector. Firmly press the VRM straight down into the connector by applying pressure on both ends of the VRM simultaneously. The retaining clips snap into the locked position when the VRM is firmly seated in the connector. If there is a gap between the VRM and the retaining clips, the VRM has not been correctly inserted; open the retaining clips, remove the VRM, and then reinsert it. 14. Reinstall the microprocessor tray in the server. a. Make sure the microprocessor-tray release latch is open; then, push the microprocessor tray into the server. Attention: Before installing the microprocessor tray, fans must be removed from the server and the microprocessor-tray release latch must be open. Attempting to insert the microprocessor tray if any fans are installed or if the latch not fully open will result in damage to the microprocessor tray. b. Close the tray levers and make sure they are securely latched. c. Press the microprocessor tray release latch down. d. Reinstall the fans and memory cassette in the server. 15. If you have other options to install or remove, do so now; otherwise, go to "Completing the installation" on page 58. 50 IBM xSeries 365 Types 8861, 8862: Hardware Maintenance Manual and Troubleshooting Guide
-
 1
1 -
2
-
3
-
4
-
5
-
6
-
7
-
8
-
9
-
10
-
11
-
12
-
13
-
14
-
15
-
16
-
17
-
18
-
19
-
20
-
21
-
22
-
23
-
24
-
25
-
26
-
27
-
28
-
29
-
30
-
31
-
32
-
33
-
34
-
35
-
36
-
37
-
38
-
39
-
40
-
41
-
42
-
43
-
44
-
45
-
46
-
47
-
48
-
49
-
50
-
51
-
52
-
53
-
54
-
 55
55 -
 56
56 -
 57
57 -
 58
58 -
 59
59 -
 60
60 -
 61
61 -
 62
62 -
 63
63 -
 64
64 -
 65
65 -
66
-
67
-
68
-
69
-
70
-
71
-
72
-
73
-
74
-
75
-
76
-
77
-
78
-
79
-
80
-
81
-
82
-
83
-
84
-
85
-
86
-
87
-
88
-
89
-
90
-
91
-
92
-
93
-
94
-
95
-
96
-
97
-
98
-
99
-
100
-
101
-
102
-
103
-
104
-
105
-
106
-
107
-
108
-
109
-
110
-
111
-
112
-
113
-
114
-
115
-
116
-
117
-
118
-
119
-
120
-
121
-
122
-
123
-
124
-
125
-
126
-
127
-
128
-
129
-
130
-
131
-
132
-
133
-
134
-
135
-
136
-
137
-
138
-
139
-
140
-
141
-
142
-
143
-
144
-
145
-
146
-
147
-
148
-
149
-
150
-
151
-
152
-
153
-
154
-
155
-
156
-
157
-
158
-
159
-
160
-
161
-
162
-
163
-
164
-
165
-
166
-
167
-
168
-
169
-
170
-
171
-
172
-
173
-
174
-
175
-
176
-
177
-
178
-
179
-
180
-
181
-
182
-
183
-
184
-
185
-
186
-
187
-
188
-
189
-
190
-
191
-
192
-
193
-
194
-
195
-
196
-
197
-
198
-
199
-
200
-
201
-
202
-
203
-
204
-
205
-
206
-
207
-
208
-
209
-
210
-
211
-
212
 |
 |
