IBM 8862 Hardware Maintenance Manual - Page 65
Replacing, hot-swap
 |
UPC - 000435172679
View all IBM 8862 manuals
Add to My Manuals
Save this manual to your list of manuals |
Page 65 highlights
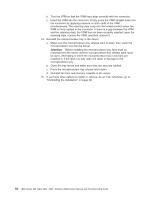
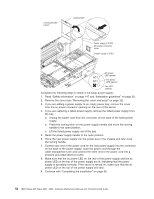
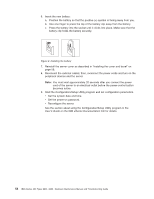
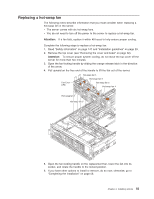
Replacing a hot-swap fan The following notes describe information that you must consider when replacing a hot-swap fan in the server. v The server comes with six hot-swap fans. v You do not need to turn off the power to the server to replace a hot-swap fan. Attention: If a fan fails, replace it within 48 hours to help ensure proper cooling. Complete the following steps to replace a hot-swap fan: 1. Read "Safety information" on page 147 and "Installation guidelines" on page 29. 2. Remove the top cover (see "Removing the cover and bezel" on page 32). Attention: To ensure proper system cooling, do not leave the top cover off the server for more than two minutes. 3. Open the fan-locking handle by sliding the orange release latch in the direction of the arrow. 4. Pull upward on the free end of the handle to lift the fan out of the server. Fan Error LED Hot-swap fan 5 Hot-swap fan 6 Hot-swap fan 3 Hot-swap fan 4 Hot-swap fan 1 Hot-swap fan 2 5. Open the fan-locking handle on the replacement fan, lower the fan into its socket, and rotate the handle to the locked position. 6. If you have other options to install or remove, do so now; otherwise, go to "Completing the installation" on page 58. Chapter 4. Installing options 55
-
 1
1 -
2
-
3
-
4
-
5
-
6
-
7
-
8
-
9
-
10
-
11
-
12
-
13
-
14
-
15
-
16
-
17
-
18
-
19
-
20
-
21
-
22
-
23
-
24
-
25
-
26
-
27
-
28
-
29
-
30
-
31
-
32
-
33
-
34
-
35
-
36
-
37
-
38
-
39
-
40
-
41
-
42
-
43
-
44
-
45
-
46
-
47
-
48
-
49
-
50
-
51
-
52
-
53
-
54
-
55
-
56
-
57
-
58
-
59
-
 60
60 -
 61
61 -
 62
62 -
 63
63 -
 64
64 -
 65
65 -
 66
66 -
 67
67 -
 68
68 -
 69
69 -
 70
70 -
71
-
72
-
73
-
74
-
75
-
76
-
77
-
78
-
79
-
80
-
81
-
82
-
83
-
84
-
85
-
86
-
87
-
88
-
89
-
90
-
91
-
92
-
93
-
94
-
95
-
96
-
97
-
98
-
99
-
100
-
101
-
102
-
103
-
104
-
105
-
106
-
107
-
108
-
109
-
110
-
111
-
112
-
113
-
114
-
115
-
116
-
117
-
118
-
119
-
120
-
121
-
122
-
123
-
124
-
125
-
126
-
127
-
128
-
129
-
130
-
131
-
132
-
133
-
134
-
135
-
136
-
137
-
138
-
139
-
140
-
141
-
142
-
143
-
144
-
145
-
146
-
147
-
148
-
149
-
150
-
151
-
152
-
153
-
154
-
155
-
156
-
157
-
158
-
159
-
160
-
161
-
162
-
163
-
164
-
165
-
166
-
167
-
168
-
169
-
170
-
171
-
172
-
173
-
174
-
175
-
176
-
177
-
178
-
179
-
180
-
181
-
182
-
183
-
184
-
185
-
186
-
187
-
188
-
189
-
190
-
191
-
192
-
193
-
194
-
195
-
196
-
197
-
198
-
199
-
200
-
201
-
202
-
203
-
204
-
205
-
206
-
207
-
208
-
209
-
210
-
211
-
212
 |
 |
