Kyocera FS-1128MFP Service Manual - Page 131
(1) Completely blank printout., (2) All-black printout., Defective control PWB.
 |
View all Kyocera FS-1128MFP manuals
Add to My Manuals
Save this manual to your list of manuals |
Page 131 highlights
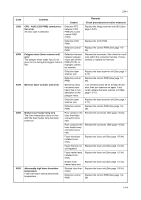
2JN (1) Completely blank printout. Print example Causes Check procedures/corrective measures Connection failure with DP connector. If a blank copy is made because the original loaded in the DP is not fed after the Start key is pressed: Turn the main power switch off, investigate the DP connector connection, and firmly connect the DP connector. DP DP connector Defective drum unit or developing unit. Open the front cover and check that the drum unit and developing unit are correctly seated (See page 1-5-30 and 1-5-29). Investigate that the terminals between the main charger unit and the drum unit are not in loose contact (See page 1-5-30) Defective transfer bias output or developing bias output. Replace the high voltage PWB (See page 1-5-45). Poor contact of developing bias terminal (spring) and high voltage output terminal B (J401, J402, J403) on the high voltage PWB. Poor contact of transfer bias terminal (spring) and transfer bias terminal T (J201, J202, J203) on the high voltage PWB. Check the high voltage PWB visually and correct or replace if necessary (See page 1-5-45). Defective laser scanner unit. Replace the laser scanner unit (See page 1-5-17). Defective control PWB. Replace the control PWB (See page 1-5-39). (2) All-black printout. Print example Causes Check procedures/corrective measures Defective main charger unit. Open the front cover and check that the drum unit and developing unit are correctly seated (See page 1-5-30 and 1-5-29). Investigate that the terminals between the main charger unit and the drum unit are not in loose contact (See page 1-5-30) Poor contact of main charger terminal Check the high voltage PWB visually and correct or replace if (spring) and main charger output ter- necessary (See page 1-5-45). minal M on the high voltage PWB. Defective main charging output. Replace the high voltage PWB (See page 1-5-45). Broken main charger wire. Replace the main charger unit (See page 1-5-31). Defective control PWB. Replace the control PWB (See page 1-5-39). 1-4-13
-
 1
1 -
2
-
3
-
4
-
5
-
6
-
7
-
8
-
9
-
10
-
11
-
12
-
13
-
14
-
15
-
16
-
17
-
18
-
19
-
20
-
21
-
22
-
23
-
24
-
25
-
26
-
27
-
28
-
29
-
30
-
31
-
32
-
33
-
34
-
35
-
36
-
37
-
38
-
39
-
40
-
41
-
42
-
43
-
44
-
45
-
46
-
47
-
48
-
49
-
50
-
51
-
52
-
53
-
54
-
55
-
56
-
57
-
58
-
59
-
60
-
61
-
62
-
63
-
64
-
65
-
66
-
67
-
68
-
69
-
70
-
71
-
72
-
73
-
74
-
75
-
76
-
77
-
78
-
79
-
80
-
81
-
82
-
83
-
84
-
85
-
86
-
87
-
88
-
89
-
90
-
91
-
92
-
93
-
94
-
95
-
96
-
97
-
98
-
99
-
100
-
101
-
102
-
103
-
104
-
105
-
106
-
107
-
108
-
109
-
110
-
111
-
112
-
113
-
114
-
115
-
116
-
117
-
118
-
119
-
120
-
121
-
122
-
123
-
124
-
125
-
 126
126 -
 127
127 -
 128
128 -
 129
129 -
 130
130 -
 131
131 -
 132
132 -
 133
133 -
 134
134 -
 135
135 -
 136
136 -
137
-
138
-
139
-
140
-
141
-
142
-
143
-
144
-
145
-
146
-
147
-
148
-
149
-
150
-
151
-
152
-
153
-
154
-
155
-
156
-
157
-
158
-
159
-
160
-
161
-
162
-
163
-
164
-
165
-
166
-
167
-
168
-
169
-
170
-
171
-
172
-
173
-
174
-
175
-
176
-
177
-
178
-
179
-
180
-
181
-
182
-
183
-
184
-
185
-
186
-
187
-
188
-
189
-
190
-
191
-
192
-
193
-
194
-
195
-
196
-
197
-
198
-
199
-
200
-
201
-
202
-
203
-
204
-
205
-
206
-
207
-
208
-
209
-
210
-
211
-
212
-
213
-
214
-
215
-
216
-
217
-
218
-
219
-
220
-
221
-
222
-
223
-
224
-
225
-
226
-
227
-
228
-
229
-
230
-
231
-
232
-
233
-
234
-
235
-
236
-
237
-
238
-
239
-
240
-
241
-
242
-
243
-
244
-
245
-
246
-
247
-
248
-
249
-
250
-
251
-
252
 |
 |
