Kyocera FS-1128MFP Service Manual - Page 133
(6) Black vertical streaks., (7) Unsharpness., (8) Gray background.
 |
View all Kyocera FS-1128MFP manuals
Add to My Manuals
Save this manual to your list of manuals |
Page 133 highlights
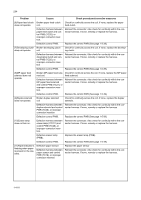
2JN (6) Black vertical streaks. Print example Causes ABC 123 Adhesion of oxide to main charger wire. Defective drum unit. Defective developing roller (developing unit). Check procedures/corrective measures Remove the drum unit (See page 1-5-30). Slide the charger cleaner (green) left and right 2 or 3 times to clean the charger wire, then return it to its original position (CLEANER HOME POSITION). Refer to the operation guide. A streak of toner remaining on drum after printing means that the cleaning blade (in the drum unit) is not working properly. Replace the drum unit (See page 1-5-30). Replace the developing unit (See page 1-5-29). (7) Unsharpness. Print example Causes Defective paper specifications. Defective transfer roller installation. Defective transfer bias output. EcoPrint mode setting. Check procedures/corrective measures Replace paper with the one that satisfies the paper specification. The transfer roller must be supported by the bushes at the both ends. Clean the bush to remove oil and debris. Replace the transfer roller if necessary (See page 1-5-32). Replace the high voltage PWB or control PWB (See page 1-545 or 1-5-39). The EcoPrint mode can provides faint, unsharp printing because it acts to conserve toner for draft printing purpose. For normal printing, turn the EcoPrint mode off by using the operator panel. For details, refer to the operation guide. (8) Gray background. Print example Causes Print density setting. ABC 123 Defective potential on the drum surface. Defective main charger grid. Defective developing roller (developing unit). Check procedures/corrective measures The print density may be set too high. Try adjusting the print density. For details, refer to the operation guide. Replace the drum unit (See page 1-5-30). Clean the main charger grid (See page 1-5-31). If a developing unit which is known to work normally is available for check, replace the current developing unit in the machine with the normal one. If the symptom disappears, replace the developing unit with a new one (See page 1-5-29). 1-4-15
-
 1
1 -
2
-
3
-
4
-
5
-
6
-
7
-
8
-
9
-
10
-
11
-
12
-
13
-
14
-
15
-
16
-
17
-
18
-
19
-
20
-
21
-
22
-
23
-
24
-
25
-
26
-
27
-
28
-
29
-
30
-
31
-
32
-
33
-
34
-
35
-
36
-
37
-
38
-
39
-
40
-
41
-
42
-
43
-
44
-
45
-
46
-
47
-
48
-
49
-
50
-
51
-
52
-
53
-
54
-
55
-
56
-
57
-
58
-
59
-
60
-
61
-
62
-
63
-
64
-
65
-
66
-
67
-
68
-
69
-
70
-
71
-
72
-
73
-
74
-
75
-
76
-
77
-
78
-
79
-
80
-
81
-
82
-
83
-
84
-
85
-
86
-
87
-
88
-
89
-
90
-
91
-
92
-
93
-
94
-
95
-
96
-
97
-
98
-
99
-
100
-
101
-
102
-
103
-
104
-
105
-
106
-
107
-
108
-
109
-
110
-
111
-
112
-
113
-
114
-
115
-
116
-
117
-
118
-
119
-
120
-
121
-
122
-
123
-
124
-
125
-
126
-
127
-
 128
128 -
 129
129 -
 130
130 -
 131
131 -
 132
132 -
 133
133 -
 134
134 -
 135
135 -
 136
136 -
 137
137 -
 138
138 -
139
-
140
-
141
-
142
-
143
-
144
-
145
-
146
-
147
-
148
-
149
-
150
-
151
-
152
-
153
-
154
-
155
-
156
-
157
-
158
-
159
-
160
-
161
-
162
-
163
-
164
-
165
-
166
-
167
-
168
-
169
-
170
-
171
-
172
-
173
-
174
-
175
-
176
-
177
-
178
-
179
-
180
-
181
-
182
-
183
-
184
-
185
-
186
-
187
-
188
-
189
-
190
-
191
-
192
-
193
-
194
-
195
-
196
-
197
-
198
-
199
-
200
-
201
-
202
-
203
-
204
-
205
-
206
-
207
-
208
-
209
-
210
-
211
-
212
-
213
-
214
-
215
-
216
-
217
-
218
-
219
-
220
-
221
-
222
-
223
-
224
-
225
-
226
-
227
-
228
-
229
-
230
-
231
-
232
-
233
-
234
-
235
-
236
-
237
-
238
-
239
-
240
-
241
-
242
-
243
-
244
-
245
-
246
-
247
-
248
-
249
-
250
-
251
-
252
 |
 |
