Kyocera FS-1128MFP Service Manual - Page 186
Fuser Detaching and refitting the fuser unit, Procedure,
 |
View all Kyocera FS-1128MFP manuals
Add to My Manuals
Save this manual to your list of manuals |
Page 186 highlights
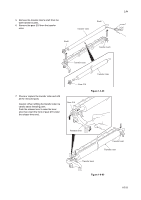
2JN 1-5-8 Fuser section (1) Detaching and refitting the fuser unit Procedure 1. Remove the left cover and right cover (See page 1-5-3). 2. Remove the wires from three clamps. 3. Remove the connector from the power source PWB. Clamp Clamps Power source PWB YC105 Connctor Power source PWB 4. Unhook four hooks and then remove the frame left duct. 5. Remove the wires from the clamp. Frame left duct Figure 1-5-51 Hook 1-5-34 Clamp Hook Hook Frame left duct Wires Hook Figure 1-5-52
-
 1
1 -
2
-
3
-
4
-
5
-
6
-
7
-
8
-
9
-
10
-
11
-
12
-
13
-
14
-
15
-
16
-
17
-
18
-
19
-
20
-
21
-
22
-
23
-
24
-
25
-
26
-
27
-
28
-
29
-
30
-
31
-
32
-
33
-
34
-
35
-
36
-
37
-
38
-
39
-
40
-
41
-
42
-
43
-
44
-
45
-
46
-
47
-
48
-
49
-
50
-
51
-
52
-
53
-
54
-
55
-
56
-
57
-
58
-
59
-
60
-
61
-
62
-
63
-
64
-
65
-
66
-
67
-
68
-
69
-
70
-
71
-
72
-
73
-
74
-
75
-
76
-
77
-
78
-
79
-
80
-
81
-
82
-
83
-
84
-
85
-
86
-
87
-
88
-
89
-
90
-
91
-
92
-
93
-
94
-
95
-
96
-
97
-
98
-
99
-
100
-
101
-
102
-
103
-
104
-
105
-
106
-
107
-
108
-
109
-
110
-
111
-
112
-
113
-
114
-
115
-
116
-
117
-
118
-
119
-
120
-
121
-
122
-
123
-
124
-
125
-
126
-
127
-
128
-
129
-
130
-
131
-
132
-
133
-
134
-
135
-
136
-
137
-
138
-
139
-
140
-
141
-
142
-
143
-
144
-
145
-
146
-
147
-
148
-
149
-
150
-
151
-
152
-
153
-
154
-
155
-
156
-
157
-
158
-
159
-
160
-
161
-
162
-
163
-
164
-
165
-
166
-
167
-
168
-
169
-
170
-
171
-
172
-
173
-
174
-
175
-
176
-
177
-
178
-
179
-
180
-
 181
181 -
 182
182 -
 183
183 -
 184
184 -
 185
185 -
 186
186 -
 187
187 -
 188
188 -
 189
189 -
 190
190 -
 191
191 -
192
-
193
-
194
-
195
-
196
-
197
-
198
-
199
-
200
-
201
-
202
-
203
-
204
-
205
-
206
-
207
-
208
-
209
-
210
-
211
-
212
-
213
-
214
-
215
-
216
-
217
-
218
-
219
-
220
-
221
-
222
-
223
-
224
-
225
-
226
-
227
-
228
-
229
-
230
-
231
-
232
-
233
-
234
-
235
-
236
-
237
-
238
-
239
-
240
-
241
-
242
-
243
-
244
-
245
-
246
-
247
-
248
-
249
-
250
-
251
-
252
 |
 |

2JN
1-5-34
1-5-8
Fuser section
(1) Detaching and refitting the fuser unit
Procedure
1.
Remove the left cover and right cover (See
page 1-5-3).
2.
Remove the wires from three clamps.
3.
Remove the connector from the power
source PWB.
Figure 1-5-51
4.
Unhook four hooks and then remove the
frame left duct.
5.
Remove the wires from the clamp.
Figure 1-5-52
YC105
Clamp
Clamps
Connctor
Power source
PWB
Power source
PWB
Frame left duct
Frame left duct
Hook
Clamp
Wires
Hook
Hook
Hook