Kyocera TASKalfa 420i 420i/520i Operation Guide - Page 277
Silent Mode, Charger Auto Cleaning, Auto Color Correction, Correcting Fine Black Lines
 |
View all Kyocera TASKalfa 420i manuals
Add to My Manuals
Save this manual to your list of manuals |
Page 277 highlights
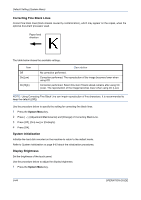
Default Setting (System Menu) 2 Press [ ], [Adjustment/Maintenance] and [Change] of Display Brightness. 3 Press [1] - [4] (Darker- Lighter) to adjust brightness. 4 Press [OK]. Silent Mode Make the machine run more quietly. Select this mode when the running noise is uncomfortable. Use the procedure below to set Silent mode. 1 Press the System Menu key. 2 Press [ ], [Adjustment/Maintenance] and [Change] of Silent Mode. 3 Press [Off] or [On]. 4 Press [OK]. Charger Auto Cleaning If black streaks appear on the printouts or scanned data, perform automatic cleaning of the main chargers. If no black line appears at the ends of the paper (margin), refer to Correcting Fine Black Lines on page 8-44. 8 1 Press the System Menu key. 2 Press [ ], [Adjustment/Maintenance] and [Change] of Charger Auto Cleaning. 3 Press [Yes]. Automatic cleaning of the main charger starts and ends in about 45 seconds. 4 Once the cleaning ends, return to the Adjustment/Maintenance screen. Auto Color Correction This setting allows you to adjust the detection level used by the machine to determine whether the original is color or black and white during Auto Color Mode. Setting a lower value will result in more originals being identified as color, while a larger value will tend to increase the number of originals being identified as black and white. Use the procedure below to set the Auto Color Detection Level. 1 Press the System Menu key. 2 Press [ ] > [Adjustment/Maintenance] > [ ] > [Change] of Auto Color Correction. 3 Press one of keys [1] to [5] (Color - B & W) to set the detection level. 4 Press [OK]. OPERATION GUIDE 8-45
-
 1
1 -
2
-
3
-
4
-
5
-
6
-
7
-
8
-
9
-
10
-
11
-
12
-
13
-
14
-
15
-
16
-
17
-
18
-
19
-
20
-
21
-
22
-
23
-
24
-
25
-
26
-
27
-
28
-
29
-
30
-
31
-
32
-
33
-
34
-
35
-
36
-
37
-
38
-
39
-
40
-
41
-
42
-
43
-
44
-
45
-
46
-
47
-
48
-
49
-
50
-
51
-
52
-
53
-
54
-
55
-
56
-
57
-
58
-
59
-
60
-
61
-
62
-
63
-
64
-
65
-
66
-
67
-
68
-
69
-
70
-
71
-
72
-
73
-
74
-
75
-
76
-
77
-
78
-
79
-
80
-
81
-
82
-
83
-
84
-
85
-
86
-
87
-
88
-
89
-
90
-
91
-
92
-
93
-
94
-
95
-
96
-
97
-
98
-
99
-
100
-
101
-
102
-
103
-
104
-
105
-
106
-
107
-
108
-
109
-
110
-
111
-
112
-
113
-
114
-
115
-
116
-
117
-
118
-
119
-
120
-
121
-
122
-
123
-
124
-
125
-
126
-
127
-
128
-
129
-
130
-
131
-
132
-
133
-
134
-
135
-
136
-
137
-
138
-
139
-
140
-
141
-
142
-
143
-
144
-
145
-
146
-
147
-
148
-
149
-
150
-
151
-
152
-
153
-
154
-
155
-
156
-
157
-
158
-
159
-
160
-
161
-
162
-
163
-
164
-
165
-
166
-
167
-
168
-
169
-
170
-
171
-
172
-
173
-
174
-
175
-
176
-
177
-
178
-
179
-
180
-
181
-
182
-
183
-
184
-
185
-
186
-
187
-
188
-
189
-
190
-
191
-
192
-
193
-
194
-
195
-
196
-
197
-
198
-
199
-
200
-
201
-
202
-
203
-
204
-
205
-
206
-
207
-
208
-
209
-
210
-
211
-
212
-
213
-
214
-
215
-
216
-
217
-
218
-
219
-
220
-
221
-
222
-
223
-
224
-
225
-
226
-
227
-
228
-
229
-
230
-
231
-
232
-
233
-
234
-
235
-
236
-
237
-
238
-
239
-
240
-
241
-
242
-
243
-
244
-
245
-
246
-
247
-
248
-
249
-
250
-
251
-
252
-
253
-
254
-
255
-
256
-
257
-
258
-
259
-
260
-
261
-
262
-
263
-
264
-
265
-
266
-
267
-
268
-
269
-
270
-
271
-
 272
272 -
 273
273 -
 274
274 -
 275
275 -
 276
276 -
 277
277 -
 278
278 -
 279
279 -
 280
280 -
 281
281 -
 282
282 -
283
-
284
-
285
-
286
-
287
-
288
-
289
-
290
-
291
-
292
-
293
-
294
-
295
-
296
-
297
-
298
-
299
-
300
-
301
-
302
-
303
-
304
-
305
-
306
-
307
-
308
-
309
-
310
-
311
-
312
-
313
-
314
-
315
-
316
-
317
-
318
-
319
-
320
-
321
-
322
-
323
-
324
-
325
-
326
-
327
-
328
-
329
-
330
-
331
-
332
-
333
-
334
-
335
-
336
-
337
-
338
-
339
-
340
-
341
-
342
-
343
-
344
-
345
-
346
-
347
-
348
-
349
-
350
-
351
-
352
-
353
-
354
-
355
-
356
-
357
-
358
-
359
-
360
-
361
-
362
-
363
-
364
-
365
-
366
-
367
-
368
-
369
-
370
-
371
-
372
-
373
-
374
-
375
-
376
-
377
-
378
-
379
-
380
-
381
-
382
-
383
-
384
-
385
-
386
-
387
-
388
-
389
-
390
-
391
-
392
-
393
-
394
-
395
-
396
-
397
-
398
-
399
-
400
-
401
-
402
-
403
-
404
-
405
-
406
-
407
-
408
-
409
-
410
-
411
-
412
-
413
-
414
-
415
-
416
-
417
-
418
-
419
-
420
-
421
-
422
-
423
-
424
-
425
-
426
-
427
-
428
 |
 |