LG LS720 User Guide - Page 101
Synchronize Your Corporate Account, Con Google Sync Settings
 |
View all LG LS720 manuals
Add to My Manuals
Save this manual to your list of manuals |
Page 101 highlights
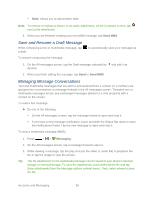
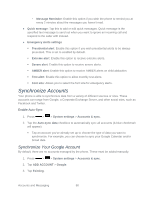
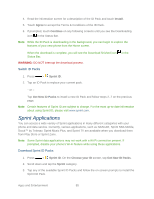
Note: If you do not already have a Google Account, tap New and follow the on-screen prompts to create your new account. 4. Tap the Email and Password fields and enter your information. 5. Tap . Your phone then communicates with the Google servers to confirm your information. 6. Read the disclaimer about Backup and restore and checkmark to keep the phone backed up with the Google Account. Then, tap Next. Configure Google Sync Settings 1. Press > > System settings > Accounts & sync. 2. Tap Google and select the desired Google Account to display the account„s synchronization settings screen. 3. Tap the type of data you wish to synchronize (Calendar, Contacts, Gmail, Google Photos, Google Play Books, and many more). 4. Tap to return to the previous screen. Synchronize Your Corporate Account Your phone is capable of synchronizing with your company„s Exchange Servers. To add a new Corporate account: 1. Press > > System settings > Accounts & sync. 2. Tap ADD ACCOUNT > Microsoft Exchange. 3. Follow the on-screen prompts to create your new Corporate email account. (See Corporate Email.) 4. Read the disclaimer and tap Activate. Depending on the type of account, you might be required to set a password screen lock. 5. Tap the options you wish to configure: Update schedule: Allows you to configure when to update emails. Days to sync email: Allows you to configure how many days of data you want to sync. Set as default: Checkmark this if you wish to set as the default account. Sync Email: Checkmark this option to sync emails. Accounts and Messaging 91
-
 1
1 -
2
-
3
-
4
-
5
-
6
-
7
-
8
-
9
-
10
-
11
-
12
-
13
-
14
-
15
-
16
-
17
-
18
-
19
-
20
-
21
-
22
-
23
-
24
-
25
-
26
-
27
-
28
-
29
-
30
-
31
-
32
-
33
-
34
-
35
-
36
-
37
-
38
-
39
-
40
-
41
-
42
-
43
-
44
-
45
-
46
-
47
-
48
-
49
-
50
-
51
-
52
-
53
-
54
-
55
-
56
-
57
-
58
-
59
-
60
-
61
-
62
-
63
-
64
-
65
-
66
-
67
-
68
-
69
-
70
-
71
-
72
-
73
-
74
-
75
-
76
-
77
-
78
-
79
-
80
-
81
-
82
-
83
-
84
-
85
-
86
-
87
-
88
-
89
-
90
-
91
-
92
-
93
-
94
-
95
-
 96
96 -
 97
97 -
 98
98 -
 99
99 -
 100
100 -
 101
101 -
 102
102 -
 103
103 -
 104
104 -
 105
105 -
 106
106 -
107
-
108
-
109
-
110
-
111
-
112
-
113
-
114
-
115
-
116
-
117
-
118
-
119
-
120
-
121
-
122
-
123
-
124
-
125
-
126
-
127
-
128
-
129
-
130
-
131
-
132
-
133
-
134
-
135
-
136
-
137
-
138
-
139
-
140
-
141
-
142
-
143
-
144
-
145
-
146
-
147
-
148
-
149
-
150
-
151
-
152
-
153
-
154
-
155
-
156
-
157
-
158
-
159
-
160
-
161
-
162
-
163
-
164
-
165
-
166
-
167
-
168
-
169
-
170
-
171
-
172
-
173
-
174
-
175
-
176
-
177
-
178
-
179
-
180
-
181
-
182
-
183
-
184
-
185
-
186
-
187
-
188
-
189
-
190
-
191
-
192
 |
 |