LG LX610 Red User Guide - Page 96
Assigning Pictures - review
 |
View all LG LX610 Red manuals
Add to My Manuals
Save this manual to your list of manuals |
Page 96 highlights
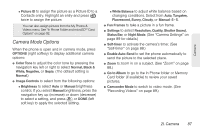
Ⅲ Assign to assign the picture to a phone task. Select an option: ● Screen Saver to use the picture as a screen saver. ● Picture ID to display the picture for all incoming calls. Ⅲ Delete to delete the picture you just took. Ⅲ Go to Album to go to the In Phone folder or Memory Card folder (if available) to review your saved pictures. Ⅲ Print to print the pictures. Use a PictBridgeenabled printer (see page 96), or use a Bluetooth-enabled printer (see page 96). Ⅲ Take New Picture to return to camera mode to take another picture. To take a picture with the phone closed: 1. To unlock the phone, press and hold the side lock button, or press once the side lock phone button, and slide the front screen Lock touch key to the right. 2. Press and hold the side camera button to enter to the Photos & Videos screen, and select the Camera option. 3. Point the camera lens at your subject. (You can check the picture framing through the external display screen.) 4. Press the side camera button to take the picture, or press the front screen touch key . (Your phone automatically saves the picture to the selected storage area.) Assigning Pictures After taking a picture, assign it as a screen saver or as a picture ID for a Contacts entry. 1. Take a picture. (See steps 1-3 on page 85.) 2. With the picture displayed, press OPTIONS (right softkey) > Assign, and select an option. Ⅲ Screen Saver to assign the picture as a screen saver. Highlight Main Screen or Outer Screen and press to assign the picture. (If the size of the picture is larger than screen, you are required to select between Fit to Screen and Select Area.) 86 2I. Camera
-
 1
1 -
2
-
3
-
4
-
5
-
6
-
7
-
8
-
9
-
10
-
11
-
12
-
13
-
14
-
15
-
16
-
17
-
18
-
19
-
20
-
21
-
22
-
23
-
24
-
25
-
26
-
27
-
28
-
29
-
30
-
31
-
32
-
33
-
34
-
35
-
36
-
37
-
38
-
39
-
40
-
41
-
42
-
43
-
44
-
45
-
46
-
47
-
48
-
49
-
50
-
51
-
52
-
53
-
54
-
55
-
56
-
57
-
58
-
59
-
60
-
61
-
62
-
63
-
64
-
65
-
66
-
67
-
68
-
69
-
70
-
71
-
72
-
73
-
74
-
75
-
76
-
77
-
78
-
79
-
80
-
81
-
82
-
83
-
84
-
85
-
86
-
87
-
88
-
89
-
90
-
 91
91 -
 92
92 -
 93
93 -
 94
94 -
 95
95 -
 96
96 -
 97
97 -
 98
98 -
 99
99 -
 100
100 -
 101
101 -
102
-
103
-
104
-
105
-
106
-
107
-
108
-
109
-
110
-
111
-
112
-
113
-
114
-
115
-
116
-
117
-
118
-
119
-
120
-
121
-
122
-
123
-
124
-
125
-
126
-
127
-
128
-
129
-
130
-
131
-
132
-
133
-
134
-
135
-
136
-
137
-
138
-
139
-
140
-
141
-
142
-
143
-
144
-
145
-
146
-
147
-
148
-
149
-
150
-
151
-
152
-
153
-
154
-
155
-
156
-
157
-
158
-
159
-
160
-
161
-
162
 |
 |